


Page 3For technical questions, please call 1-800-444-3353.SKU 94822
Operating Instructions
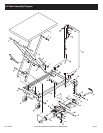
1. Before loading and while stationary, lock the back
Casters (19) to prevent the Lift Table from moving.
2. The Table (1) is raised by pumping the Lifting Pedal
(27) with your foot until the desired height is achieved.
3. Once desired height is reached, swing down the
Safety Bars (7) on either side of the Lift Frame. This
will prevent any kind of uncontrolled Table drop.
4. To lower the Table, Squeeze the Release
Handle (22) at the top of the main Handle.
Note: Be sure to lift Safety Bars up, allowing the
Table to be completely lowered (if needed).
Maintenance
1. Lubricate hydraulic connections monthly
with a good quality grease.
2. Check for the free movement and wear
of the wheels. Replace if needed.
3. Check the Caster brakes regularly. They
should lock rmly and release completely.
4. If you encounter difculty using the Release
Handle to lower the Table, the Control
Cable (49) may need adjusting.
WARNING! Make sure the Release Handle is pressed
only halfway down during adjustment. This will allow
the Table to lower slowly for safety purposes.
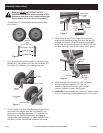
a. With assistance, tip over Lift Table.
b.
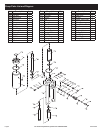
Hex Bolt (16)
Cable Bolt (50)
Control Cable (49)
Figure 5
Loosen the Cable Bolt (50) and Cable Nut
(51) and tug the Control Cable until it is tight.
WARNING! Do not pull too tight; you want to
leave a small amount of give. See Figure 5.
c. Re-fasten the Nut and Bolt. Then test the
Release Handle, making sure the Release
Handle is pressed halfway down.
5. Check for oil leakage from the hydraulic cylinder.
The hydraulic cylinder is not user serviceable.
WARNING! Any service or repairs to the Hydraulic
Lift Table should be performed by a qualied
service technician. Improper repairs or service
could result in equipment failure or personal injury.
Bleeding Instructions
If the Lift Table is not performing properly, it may
be due to air in the hydraulic system. Follow
these steps to bleed air from the system.
1. Raise the Table to it’s highest position.
2. Swing down the two Safety Bars so that they both
rest on the top platform of the Base Assembly.
3. Remove the rubber Oil Plug (J04). You can carefully
remove it with a large at head screwdriver.
4. After the Oil Plug is removed, swing the two
Safety Bars back against their stops.
5. Squeeze the Release Handle to lower the Table. This
should purge the air out of the hydraulic system.
6. Raise the Table to it’s highest position and swing both
the Safety Bars down onto the Base Assembly (17).
7. Top off hydraulic uid into the oil hole where the Oil Plug
goes until it is full. Note: Make sure you use new oil.
8. Replace the Oil Plug by rmly
pressing it in while twisting it.