


PAGE 30 — HHXG5 RIDE-ON TROWEL • OPERATION MANUAL — REV. #1 (10/25/10)
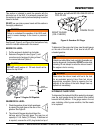
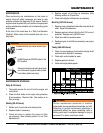
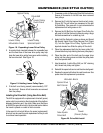
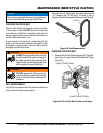
Figure 18. Expanding Lower Drive Pulley
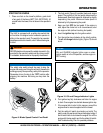
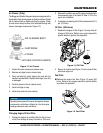
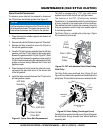
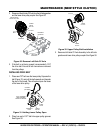
3. A wooden block inserted between the moveable face
and the fixed face of the lower drive pulley may help
keep the lower drive pulley faces open while installing
the new drive belt. See Figure 19.
Figure 19. Holding Lower Pulley Open
4. If the belt is not being reused (recommended), CUT
the drive belt. Ensure all belt remnants are removed
from the pulleys.
Installing the Drive Belt (Using New Drive Belt)
The HHX is equipped with a replacement drive belt (spare)
carrier, which is mounted on the inboard side of the platform
between the battery and the clutch. Make sure that there
is ALWAYS a spare drive belt in the drive belt carrier before
the trowel is placed on a slab to finish concrete.
In the event of a drive belt failure, the spare (replacement)
drive belt can be used for quick replacement at the job site
to continue trowel operation.
Lower Pulley
Fixed Face
Lower Pulley
Spread Apart
Upper Pulley
Drive Belt
Lower Pulley
Moveable Face
Insert
Wood Block
1. If necessary, refer to Removing Drive Belt Instructions.
Ensure all remnants of old belt have been removed
from pulleys.
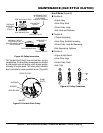
2. Remove the 2 bolts that secure the drive belt carrier.
(Figure 20) This will allow free movement of the belt
for installation. Take care with to not contaminate the
relplacement belt with grease or dirt.
3. Remove the 5/8 Bolt from the Upper Drive Pulley. You
will need to hold the flywheel in place by using a large
flat blade screwdriver or suitable pry bar.
4. Again hold the flywheel in place as above and thread
the Special Upper Drive Pulley Removal Tool (Figure
16), into the Upper Drive Pulley. Tighten until the
taperlock breaks free. Slide the pulley off the shaft.
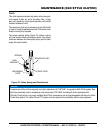
5. Place the replacement belt into the lower pulley first.
(A wood block may help holding the lower pulley open).
6. Place the other end of the belt over the upper drive
pulley into the pulley groove and slide the pulley back
onto the tapered shaft.
7. Use threadlock, (Loctite Blue 246) on 5/8" retaining
bolt, thread into pulley and tighten.
8. Reinstall the spare belt carrier and the drive belt guard.
9. Replace the spare belt before the next trowel use. See
spare drive belt replacement procedures.
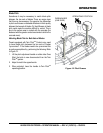
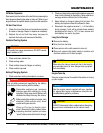
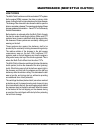
Figure 20. Drive Belt Install
Lower
(Driven) Pulley
CV Joint
Wooden Block
Spare Drive
Belt Carrier
New Spare
Drive Belt
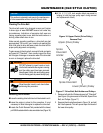
MAINTENANCE (OLD STYLE CLUTCH)