


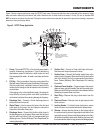


PAGE 14 — QP3TZ TRASH PUMP — OPERATION AND PARTS MANUAL — REV. #3 (10/21/11)
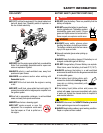
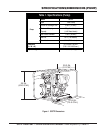
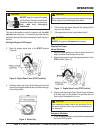
Figure 2 shows a typical application using the QP3TZ Trash pump. Please note that this pump is intended for the removal of clean
water and water containing some debris and solids. Maximum size of solids should not exceed 1.5 inch (30 mm) in diameter. DO
NOT set strainer on bottom of water bed. Placing the strainer above the water bed will prevent the pump from drawing in excessive
amounts of sand and foreign debris.
1. Pump – The model QP3TZ is a 3-inch trash pump used in
general dewatering applications. Typical dewatering
applications consist of manholes, septic tanks, fast and
slow seepage ditch water, silt water, mud water and muck
water.
2. Fill Cap – Prior to operation, the pump casing should be
filled with water. Remove this cap to add water to the pump.
After the initial prime, a sufficient amount of water will be
retained in the casing so that the operator will not need to
re-prime later.
If the casing is dry or has insufficient water, the pump will
have difficulty in priming which could lead to premature
mechanical seal wear thus causing damage to the pump.
3. Discharge Port – Connect a 3-inch discharge hose to
either port (one of two ports).
4. Worm Clamp – Used to secure the hose to the inlet and
outlet ports on the pump. Use two clamps to secure the
hose on the inlet side of the pump.
5. Discharge Hose – Connect this flexible rubber hose to
the discharge port on the pump. Make sure that the hose
lays flat and is not kinked. Use only recommended type
discharge hose. Contact Multiquip Parts Department for
ordering information.
6. Suction Port – Connect a 3-inch inlet hose to this port.
Use two worm clamps to secure the hose.
7. Suction Hose – Connect this flexible rubber hose to the
suction portion the pump. Make sure that the hose lays flat
and is not kinked. Use only recommended type suction
hose. Contact Multiquip Parts Department for ordering
information.
8. Clean-out Cover Handles – To gain access to the pump's
clean-out area, grip both handles, then pull to remove cover.
Make sure both locking knobs have been released before
attempting to remove clean-out cover.
9. Drain Plug – Remove this plug to drain water from the
pump.
10. Clean-out Cover – Remove cover to gain access to the
clean-out area.
11. Locking Knobs – Turn both knobs clockwise to secure
clean-out cover, turn counterclockwise to release cover.
12. Strainer – Always attach a strainer to the bottom side of
the suction hose to prevent large objects and debris from
entering the pump. Strainer should be positioned so that it
will remain completely under water. Running the pump with
the strainer above water for long periods can damage pump.
Figure 2. QP3TZ Pump Application
COMPONENTS
NOTE:
CONTACT YOUR NEAREST
MULTIQUIP DEALER FOR
QUICK DISCONNECT HOSES
AND FITTINGS.
5
5
4
4
4
7
8
9
10
11
12
4
3
21
6