


C1445M-D (11/04) 9
Enclosure Reassembly and Recharging
REASSEMBLY
Whenever the enclosure is disassembled, it should be recharged after reassembly and prior to installation. Recharging requires the use of a
Pelco EH8000RKIT recharge kit (or equivalent) and applicable O-ring kit, part EH8004ORKIT or EH8006ORKIT.
To prepare the enclosure for recharging, follow the steps below.
1. Once the enclosure has been disassembled, remove the O-ring from the rear plate and install a new O-ring in the O-ring groove.
2. After installing the new O-ring, smear a liberal amount of O-ring lubricant (provided) on the exterior surface of the O-ring and rear plate.
Replace the desiccant bag in the enclosure with the new one (provided).
3. Slide the camera sled back into the body making sure the front lip of the sled is under the retaining bracket of the enclosure. When fully
installed, the rear plate will fit firmly into the rear opening of the housing and the retaining grove will be fully visible.
4. Reinstall the spiral retaining ring in the grove in the rear of the enclosure.
RECHARGING
1. Pressurize the inside of the enclosure using the EH8000RKIT recharge kit. Connect the regulator to the tank by threading the nut into the
socket of the tank valve. Tighten with a wrench. This regulator is factory preset for 12 psi (83 kPa).
2. Once the regulator has been secured to the tank, open the regulator valve first and then the tank value.
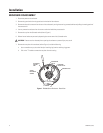
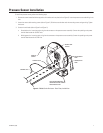
3. Remove the Schraeder valve cap (refer to Figure 1). Affix the self-holding tire chuck to the Schraeder valve.
4. To reduce the purge time necessary to remove oxygen from the enclosure, position it so that the window is pointing up.
5. Remove the plastic cap on the pressure relief valve on the rear of the enclosure. Use a small screwdriver and hold the valve open. Allow the
nitrogen to flow through the enclosure until the humidity indicator registers the lowest humidity level, changing color from pink to blue.
(The humidity indicator can be viewed through the front window of the enclosure looking at the inside top of the enclosure.) Once the
humidity indicator registers the lowest level, remove the screwdriver and allow nitrogen to continue to flow into the enclosure until you no
longer hear the flow of nitrogen from the tank to the enclosure.
6. Remove the tire chuck from the Schraeder valve. Replace the Schraeder valve and pressure relief valve caps.
POWER CONNECTION
1. Reconnect the ground wire to the ground stud on the back of the enclosure.
2. Reconnect the electrical connector and turn on power.