


- 16 -
.
Chapter 6 Frequency Scanning
Frequency scanning can be achieved by either of two methods: the
first method involves scanning of all frequencies between a pre-set
upper and lower scan frequency. The second method permits the
scanning of frequencies previously programmed in the memory
locations 0 thru 9.
All-Frequency Scanning
To allow All-Frequency scanning, the user must first program the
upper and lower scan limit frequencies as follows:
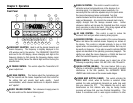
1. Press the PRG (Program) key.
2. Press the SCAN key. ("PRG SCAN+" should appear in the lower
right-hand corner of the display window.)
3. Using the SHF key and the UP and DOWN arrows, select the
upper scan limit frequency.
4. Press the SCAN key again. ("SCAN-" should appear in the
display window.)
5. Using the SHF key and UP and DOWN arrows, select the lower
scan limit frequency, then press the ENT key.
The upper and lower scan limits have now been programmed. To
activate the scan feature, return the radio to manual operation and
press the SCAN button. If the display shows "SCAN+", the radio
will scan from the lower limit to the upper limit. If "SCAN-" is
displayed, the unit will scan from the upper limit to the lower limit.
To change from "SCAN+" to "SCAN-" or vice versa, press SCAN.
NOTE
Whichever upper and lower scan limits are programmed in, are
also the upper and lower operating limits of the radio. The radio
will not operate above or below the scan limits last programmed
in. Full band coverage can be returned by reprogramming the
original band edges.
- 17 -
Frequency Scanning (Continued)
Memory Scanning
The RCI-5054DX has 10 non-volatile memory locations which can
be programmed to any frequency within the operating range of the
radio. The scan function of the unit can scan the frequencies in the
10 memory locations.
The first step in utilizing the memory scan function is programming
the desired frequencies into the memory locations 0 thru 9 by
performing the following steps:
1. With the radio operating in the manual mode, press the PRG
(Program) key.
2. Press the MEM key. "PRG" should display in the lower right-
hand corner of the LCD display. "MEM" should display in the
upper left portion of the display. A number between 0 and 9 will
display directly below MEM. This number represents the
memory location currently being shown on the frequency
display. Pressing the MEM key will increase the memory
counter to the next memory location and the frequency in that
memory location will be displayed.
3. Set the new frequency to be stored in the memory location
displayed by using the SHF key and the UP and DOWN arrows.
After the desired frequency is indicated, press ENT. This will
overwrite whatever frequency had been previously stored at this
location.
4. Repeat steps 2 and 3 for all of the memory locations to be
programmed.
5. After the desired memory locations have been programmed with
frequencies, return the unit to the manual mode of operation by
pressing the MAN key.
6. To initiate memory scanning, press MEM and then SCAN. The
display will show "SCAN+" or "SCAN-" to indicate whether the
radio is scanning from the lowest to the highest memory location
or vice versa. To return the radio to normal (non-scanning)
operation, press the MAN key.