


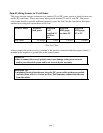

Installation
Installation Overview
There are three basic steps you need to follow when installing the power inverter.
1) Mounting: Mount the inverter securely
2) Wiring: Wire the inverter to a 12 VOLT source
3) Testing: Test for proper operation
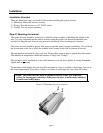
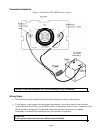
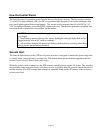
Step #1: Mounting the Inverter
The power inverter should be secured to a solid flat surface capable of handling the weight of the
unit. It is very important that the unit be secured using the proper size mounting hardware (not
included) to keep the unit from moving around or becoming loose in emergency situations.
The power inverter should be placed with space around the unit for proper ventilation. Do not block
the air entrance to the fan or block the exhaust holes located on the side or bottom of the unit.
The unit must be mounted in a dry, cool area. Do not allow water to drip or splash onto the inverter.
The ambient air temperature should be between 32 deg F and 75 deg F.
The unit must not
be mounted in an area with batteries or in any area capable of storing flammable
liquids such as gasoline.
To minimize cable lengths, the unit should be mounted as close as possible to the battery, but not in
the same compartment. If you have a choice, it is better to run longer AC wires than DC cables.
Caution: The power inverter must be mounted securely in any type of moving
vehicle. In an emergency situation, if the power inverter is not securely mounted,
it could cause bodily injury
Figure 2, Mounting the power inverter
page 6