


XT9
6
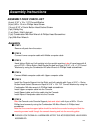
ASSEMBLY PACK CHECK LIST
(4 pcs) 5/16 x 19 x 1.5T Curved Washer
(4 pcs) M5 x 15 m/m Phillips Head Screw
(14 pcs) 5/16 x15m/m Button Head Socket Screw
(1pc) Safety Key
(1 pc) Deck / Belt Lubricant
(1 pc) Combination M5 Allen Wrench & Phillips Head Screwdriver
(1pc) M6 Allen Wrench
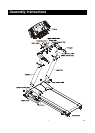
Assembly
STEP 1
Remove all parts from the carton.
STEP 2
Connect Lower computer cable with Middle computer cable.
STEP 3
Hand tighten Right and Left uprights into the upright receiving tube of frame base with 8
pcs of 5/16x 15m/m Button Head Socket Screws and 2pcs of 5/16 x 19 x 1.5T Curved
Washers by using the Combination M5 allen Wrench & Phillips head screwdriver.
STEP 4
Connect Middle computer cable with Upper computer cable.
STEP 5
Install the Console Support into the Right and Left uprights with 6 pcs of 5/16 x 15m/m
Button Head Socket Screws and 2pcs of 5/16 x 19 x 1.5T Curved Washers by using the
Combination M5 allen wrench &
Phillips head screwdriver
.
Install Upper computer cable into the Console.
Install Speed cable and Incline cable into the Console.
Install 2pcs of Handpulse cable into the Console.
STEP 6
Slide the Console onto Console Support plate and attach with 4 pcs of M5 x 15 m/m
Phillips head screws by using the Combination M5 Allen Wrench & Phillips head
screwdriver.
Note that the console support plate should be inside the console housing and that the
mounting screws install though the console housing and into the mounting plate.
PLEASE LOCK DOWN ALL HARDWARE AFTER THE ACCESSSORIES HAVE BEEN
ASSEMBLED.
Assembly Instructions