EN 35
Setting Up the Camera Using RM-P2580 (continued)
AREA DISPLAY Setup (TITLE)
This section describes procedures to display area titles on the
screen, when the 360° panning (horizontal) range is divided
into 16 areas and when the camera is manually rotated. Title
for each area can be specified up to 16 characters. (Turning
ON/OFF Area Title display AAREA DISPLAYB (A pg. 26))
1 Select a camera. (ARM-P2580 AINSTRUCTIONSB)
CAMERA buttonNNumeric key (Camera Number)NENTER button
●Video images of the selected camera will be output.
2 Display the MENU screen. (A pg. 21, steps 2 to 4)
MENU button (3 sec.) N Select ACAMERA..B using the PAN lever N
SET button.
●The AMENUB screen will be displayed.
3 Move the PAN lever upward/downward to shift the cursor (E)
to the ACAM. TITLE/ALARM..B item, followed by pressing the
SET button.
●The ACAMERA TITLE/ALARMB screen will be displayed.
4 Shift the cursor (E) to the AAREA DISPLAYB item, move the
PAN lever leftward/rightward to select the ATITLEB, followed
by pressing the SET button.
●The AAREA TITLE EDIT AREA 1B screen will be displayed. (Home
position corresponds to AREA 1)
●The first character appears blinking and input is enabled.
5 Move the PAN lever upward/downward or leftward/rightward
to select the first character to input.
●The selected character will appear blinking.
6 Press the SET button.
●The first character of the title is now confirmed and input of the
second character is possible.
●Press the WIDE button to move the blinking cursor in the Title Input
Field leftward. Use this when amending the set title.
7 Press the FAR button.
●The camera moves to the next area and the AAREA TITLE EDIT
AREA 2B screen will be displayed.
●Press the NEAR button to return to the previous area . The previous
AAREA TITLE EDIT AREA 1B screen will be displayed.
8 Repeat Steps 5 to 7.
●Repeat procedure to enter a title for each area. (AREA 1 to AREA 16)
9 Press the MENU button.
●The set area title will be stored and the screen will return to the
previous menu.
MEMO
●Only displayed for the TK-C625E model.
AREA
2
AREA
1
AREA
16
AR
EA
1
5
HOME
POSITION
SETUP
MENU SET
SPEED
IRIS
AF
FOCUS
ZOOM
OPEN
FAR
TELE CLEAR
/HOME
7
4
1
8
0
5
2
9
6
3
ENTER
AUTO
PAN
OPTION
1
OPTION
2
CAMERA
POSI-
TION
AUTO
PATROL
CLOSE
NEAR
WIDE
AUTO F-1 F-2 F-3
PAN/TILTLENS
CAMERA/POSITION
CAMERA POSITION
REMOTECONTROLUNIT
RM-P2580
ALARM
POWER
KEYLOCK
TELE
button
MENU button
CAMERA button
SET button
PAN lever
WIDE button
ENTER
button
NEAR button
FAR
button
Numeric
keys
MENU
CAM.FUNCTION1..
CAM.FUNCTION2..
CAM.TITLE/ALARM..
CAM.ALC/VIDEO..
AUTO PAN/PATROL/TRACE..
POS.FUNCTION SET..
FACTORY SETTINGS..
<
MENU
>
EXIT
<
SET
>
SUB MENU
MENU Screen
CAMERA TITLE/ ALARM
CAM.TITLE EDIT..
AREA DISPLAY.. TITLE
ALARM TITLE SIZE DOUBLE
ALARM TITLE EDIT..
ALARM INPUT..
ALARM OUTPUT..
<
MENU
>
RETURN
<
SET
>
SUB MENU
<
FOCUS KEY
>
AREA No. SELECT
<
MENU
>
RETURN
<
SET
>
CHAR .SET
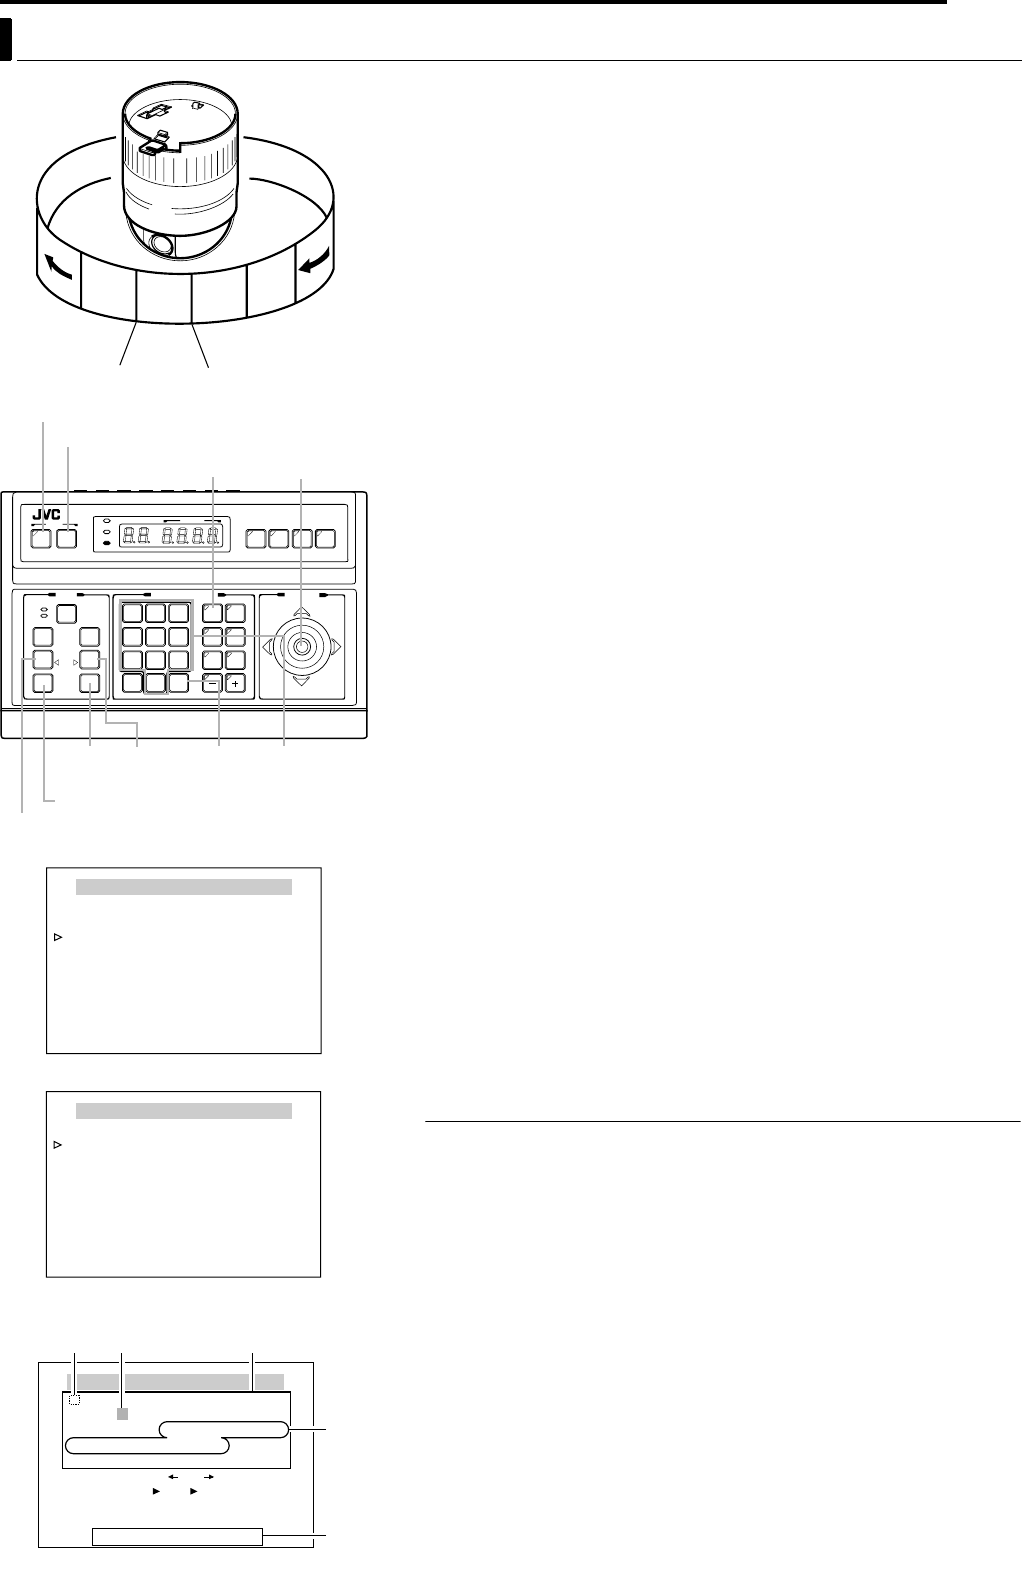
AREA TITLE EDIT AREA∗ ∗
0123456789ABCDEFGHIJKLMNO
PQRSTUVWXYZabcdefghijklmno
pqrstuvwxyzÄÖÜÊÎÔÛÇÑäëïöü
âêîôûáéíóúàèìòùçñß¡¿.,’-:/
() <>
CLRCANCEL[][]INSDEL
WT
[]
ALARM TITLE EDIT Screen
Space Blinking Character area
Title input
field
A MENO
TK-C625.book Page 35 Thursday, March 31, 2005 4:20 PM


