


Toll free: 1-877-536-3976
Local: 1-408-962-0515
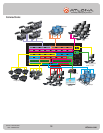
5
atlona.com
5
6
7
8
4
3
2
1
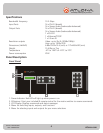
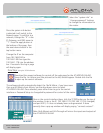
1. Video Inputs. Sources such as DVD players and computers should be connected here.
2. Video Outputs. Video displays should be connected here.
3. Audio Inputs. Stereo audio should be connected here with a balanced or unbalanced
connection.
4. Audio Outputs. Stereo audio connection output of either balanced or unbalanced audio.
5. TCP/IP connector. Connect to your switcher through a network by connecting an Ethernet cable
here.
6. IR Port. Connect included IR Receiver here for extended IR capabilities.
7. RS-232 connector. Connect included RS-232 cable here if you wish to control your switcher by
PC or 3rd party controller
8. Primary and Secondary Power Supply. Connect included power cables here.
Back Panel
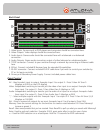
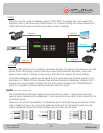
AV : Used to select input to output. Example: Input 3 to output 5 - Press 3 then AV then 5
(displays as 3AV5 on the LCD display)
Video: Independent switching to transfer just the video of an input to an output. Example: Video
from input 1 to output 3 - Press 1 then Video then 3 (displays as 1V3)
Audio: Independent switching to transfer just the audio of an input to an output. Example: Audio
from input 2 to output 5 - Press 2 then Audio then 5 (displays as 2A5)
“,” : Select multiple outputs with this. Example: Input 1 to output 3-5. Press 1 then AV then 3,4,5
(displays as 1AV345)
ALL : Press to connect all outputs for an input. Example: Input 2 to all outputs. Press 2ALL
Memory: Save the current settings for the switcher to create a reset between 0-9. Press Memory3
to save as preset 3
Recall: Uses saved presets that you’ve created. Press Recall3 to pull up what you saved with Memory3
Enter: Used to end each selection. Example: 3AV5, press enter after to confirm your choice
<--: Used for EDID selection or as a backspace. Hold for 10 seconds for EDID commands
Panel Control