Unied Access Point Administrator’s Guide
Unied Access Point Administrator’s Guide
Page 115
March 2012
Appendix B - Conguration Examples
Appendix B - Conguration Examples
This appendix contains examples of how to congure selected features available on the UAP. Each example contains
procedures on how to congure the feature by using the Web interface, CLI, and SNMP.
This appendix describes how to perform the following procedures:
•) “Conguring a VAP” on page 115
•) “Conguring Radio Settings” on page 116
•) “Conguring the Wireless Distribution System” on page 118
•) “Clustering Access Points” on page 119
•) “Conguring Client QoS” on page 121
For all SNMP examples, the objects you use to AP are in a private MIB. Take DWL-6600AP for example, the path
to the tables that contain the objects is iso(1).org(3).dod(6).internet(1).private(4).enterprises(1).dlink(171).dlink-
products(10).dwl-6600AP(128).dwl6600AP(1).dwl_6600AP(1).dwlWLANAPNewMibs(26).
DWL-8600AP: 1.3.6.1.4.1.171.10.37.29.1.26
DWL-6600AP: 1.3.6.1.4.1.171.10.128.1.1.26
DWL-3600AP: 1.3.6.1.4.1.171.10.129.1.1.26
DWL-2600AP: 1.3.6.1.4.1.171.10.130.1.1.26
Conguring a VAP
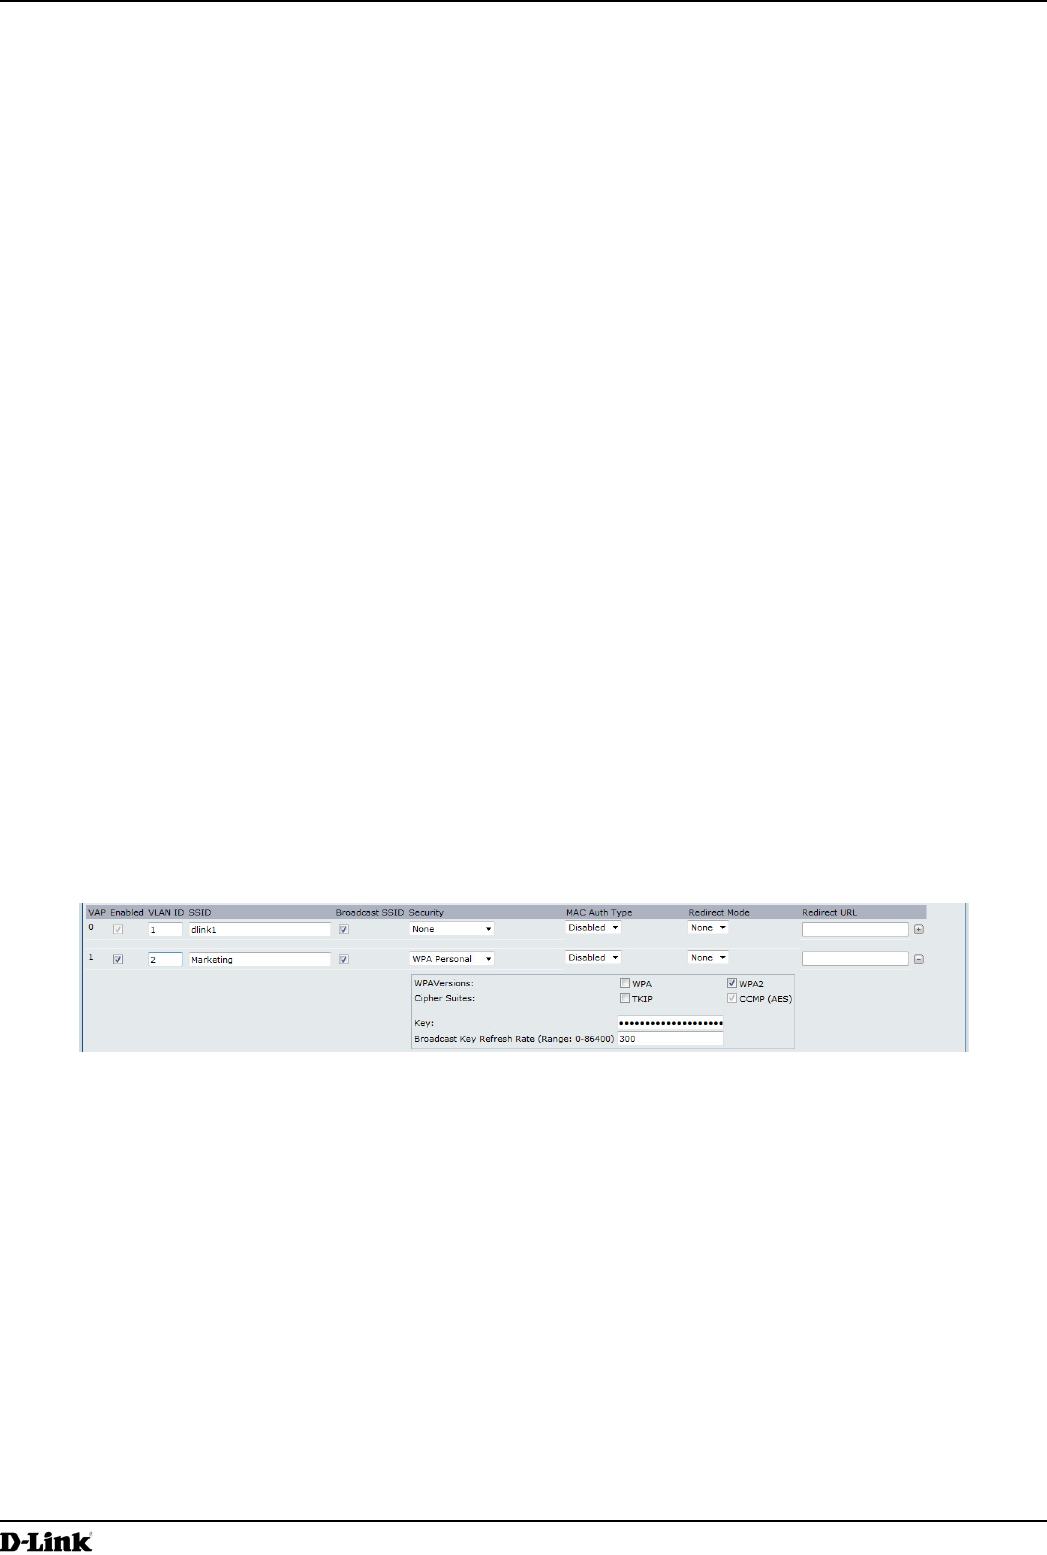
This example shows how to congure VAP 1 with the following non-default settings:
•) VLAN ID: 2
•) SSID: Marketing
•) Security: WPA Personal using WPA2 with CCMP (AES)
VAP Conguration from the Web Interface
1.) Log onto the AP and navigate to the Manage > VAP page.
Figure 69 - VAP Conguration from the Web Interface
2.) In the Enabled column for VAP 1, select the check box.
3.) Enter 2 in the VLAN ID column.
4.) In the SSID column, delete the existing SSID and type Marketing.
5.) Select WPA Personal from the menu in the Security column. Additional elds appear.
6.) Select the WPA2 and CCMP (AES) options, and clear the WPA and TKIP options.
7.) Enter a WPA encryption key in the Key eld. The key can be a mix of alphanumeric and special characters. The
key is case sensitive and can be between 8 and 63 characters.
•) Click Apply to update the AP with the new settings.
VAP Conguration from the CLI
1.) Connect to the AP by using Telnet, SSH, or a serial connection.
2.) Enable VAP 1.
set vap vap1 status up
3.) Set the VLAN ID to 2.
