


3
Instruction Sheet 6081-P
LIQ_MAN_ABR_6081-P October 2013
Quick Start Guide - 6081 Wireless pH Transmitter
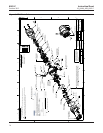
1. Install the Power Module inside the rear enclosure. Follow the installation instructions on p.9 “Power Module
Installation”.
2. Wire the pH or ORP sensor to the transmitter. Refer to the sensor instruction sheet for details.
3. Once the connections are secure and veried, install the Power Module to power to the transmitter.
4. When the transmitter is powered up for the rst time, Quick Start screens appear. Using Quick Start is easy.
a. A blinking eld shows the position of the cursor.
b. Use the or key to move the cursor left or right. Use the or key to move the cursor up or down or to
increase or decrease the value of a digit. Use the or key to move the decimal point.
c. Press ENTER to store a setting. Press EXIT to leave without storing changes. Pressing EXIT also returns the
display to the previous screen.
5. Choose a local language.
6. Choose measurement: pH, ORP, or Redox.
7. Choose preamplier location. Select Xmtr to use the integral preamplier in the transmitter.
8. Choose Off or On for displayed diagnostics.
9. Select measurement update rate. Select ENTER to choose an update rate of 1 minute or enter a value from 1 second to
10 minutes.
10. Choose temperature units: °C or °F
11. Choose Yes to Setup the Wireless Network or No if the Network ID and the Join Key have already been entered.
12. Enter the 5-digit Wireless Network ID. This ID number must match the Network ID of the 1420 Wireless Gateway.
13. Enter the 8-digit Network Join Key number 1 of 4 to match the 1420 Wireless Gateway. See the Note below for
clarication.
14. Enter Network Join Key numbers 2, 3, and 4 to match the 1420 Wireless Gateway.
15. The transmitter will exit Quick Start and display the live measurement screen.
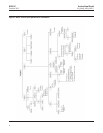
16. To change the Network ID or Join Key, HART address, or measurement-related settings from the default values, and
to set security codes, press MENU. Select Program and follow the prompts. Refer to the appropriate menu tree.
17. To return the transmitter to default settings, choose Reset Analyzer in the Program menu.
Note regarding Wireless Device Configuration
In order to communicate with the 1420 Wireless Gateway, and ultimately the Information System, the transmitter must
be congured to communicate with the wireless network. This step is the wireless equivalent of connecting wires from a
transmitter to the information system.
Using a Field Communicator or AMS, enter the Network ID and Join Key so that they match the Network ID and Join Key
of the gateway and other devices in the network. The Network Join Key consists of four (4) blocks, each with an eight
digit code. The code of each block must match its corresponding block in the 1420 in order for the 6081 to join the
network.
If the Network ID and Join Key are not identical, the transmitter will not communicate with the network. The Network ID
and Join Key may be obtained from the 1420 Wireless Gateway on the Setup>Network>Settings page on the web server.
The nal device network conguration piece is the Update Rate. This by default is one (1) minute. This may be changed at
commissioning, or at any time via AMS or the 1420 Wireless Gateway’s web server. The Update Rate should be between 1
second and 10 minutes.
When device conguration is completed, remove the power module and replace the rear cover of the transmitter until
the time of actual live installation in the process. Tighten the cover to the proper tension for safety approvals.
Note
For installation and operation at high elevations, slight convex bulging of the front keypad overlay is possible. If bulging occurs, it
is recommended to unscrew the two Philips head screws that faster the front cover to the central housing to release any internal
pressure. This will equalize the device’s internal pressure to the ambient atmospheric pressure. Re-tighten the two Philips head
screws to secure the front cover before device installation or operation. Make sure to perform the pressure equalization in a clean,
dry area.