


7
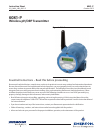
Instruction Sheet 6081-P
LIQ_MAN_ABR_6081-P October 2013
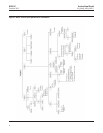
pH Calibration Procedure – Auto Buffer Calibration
1. Obtain two buffer solutions. Ideally, the buffer values should bracket the range of pH values to be measured.
2. Remove the pH sensor from the process liquid. If the process and buffer temperatures are appreciably different place
the sensor in a container of tap water at the buffer temperature. Do not start the calibration until the sensor has reached
the buffer temperature. Thirty minutes is usually adequate.
3. Press MENU. The main menu appears. Choose Calibrate.
4. Choose pH.
5. Choose BufferCal.
6. Choose Auto.
7. To continue with the calibration, choose Buffer1.Then go to step 8. To change stability criteria, choose Setup and go to
step 19.
8. Rinse the sensor with water and place it in buffer 1. Be sure the glass bulb and the reference junction are completely
submerged. Swirl the sensor.
9. The screen at left is displayed with “Wait” ashing until the reading is stable. The default stability setting is <0.02
pH change in 10 sec. To change the stability criteria, go to step 19. When the reading is stable, the screen in step 10
appears.
10. The top line shows the actual reading. The transmitter also identies the buffer and displays the nominal buffer value
(buffer pH at 25 °C). If the displayed value is not correct press ▼ or ▲ to display the correct value. The nominal value
will change, for example from 7.01 to 6.86 pH. Press ENTER to store.
11. The screen at left appears momentarily.
12. The screen at left appears. Remove the sensor from Buffer 1, rinse it with water, and place it in Buffer 2. Be sure the
glass bulb and the reference junction are completely submerged. Swirl the sensor. Choose Buffer2.
13. The screen is displayed with “Wait” ashing until the reading is stable. When the reading is stable, the screen in step
14 appears.
14. The top line shows the actual reading. The transmitter also identies the buffer and displays the nominal buffer value
(buffer pH at 25 °C). If the displayed value is not correct, press ▼ or ▲ to display the correct value. The nominal value
will change, for example from 9.91 to 10.02 pH. Press ENTER to store.
15. The screen at the left appears momentarily.
16. If the calibration was successful, the transmitter will display the offset and slope (at 25°). The display will return to the
screen in step 6.
17. If the slope is out of range (less than 45 mV/pH or greater than 60 mV/pH) or if the offset exceeds the value
programmed in Section 8.4, an error screen appears. The display then returns to the screen in step 6.
18. To return to the main display, press MENU then EXIT.
19. Choosing Setup in step 7 causes the Buffer Stabilize screen to appear. The transmitter will not accept calibration data
until the pH reading is stable. The default requirement is a pH change less than 0.02 units in 10 seconds. To change
the stability criteria:
a. Enter the desired stabilization time
b. Enter the minimum amount the reading is permitted to change in the time specied in step 19a.
20. To return to the main display, press MENU then EXIT.