


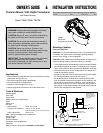


Mounting & Adjusting the Bracket
CAUTION: Do not position the transducer deeper in the water
than necessary to avoid increasing drag, spray, and water noise
and reducing boat speed.
CAUTION: The stainless steel bracket must be isolated from a
metal hull to prevent electrolytic corrosion. If no shim is being
used, place non-metal insulating washers between the bracket
and the metal hull.
1. Apply marine sealant to the threads of four of the hex-washer-
head screws to prevent water seepage into the transom. Being
sure any shim(s) is in place, screw the bracket to the hull using
a socket wrench (see Figure 4). Do not tighten the screws
completely at this time.
2. Reinstall the transducer. While holding the transducer assembly
against the bracket, insert the hinge pin through the upper hole
in the bracket and the support. Slide the spacer onto the pin
and push it through the remaining hole in the support and the
bracket. Reattach the safety ring.
3. Slide a washer onto the locking pin. Push it through the lower
hole in the bracket, slide it along the channel in the support, and
through the second hole in the bracket. Slide the second
washer onto the free end of the pin and reattach the safety ring.
4. With the transducer in the operational position, Use a straight edge
to sight the underside of the transducer relative to the underside of
the hull (see Figure 5). The trailing edge of the transducer should
be 1–6mm (1/16–1/4") below the leading edge.
5. Using the vertical adjustment space in the bracket slots, slide the
assembly up or down until the bottom inside corner of the
transducer projections 0–3mm (0–1/8") below the bottom of the
hull (see Figure 1). When you are satisfied with the position of the
transducer, tighten the four bracket screws. For clear access to
the screws, remove the transducer assembly from the bracket
(see Figure 4). When reattaching, be sure to include the spacer.
Testing on the Water
1. Test the transducer at 200kHz with the engine off.
2. Become familiar with your echosounder’s performance at a
speed of 4kn (5 MPH).
3. Gradually increase the boat speed and observe the gradual
decline of performance due to turbulent water flowing over the
transducer’s active surface.
NOTE: As the speed increases the performance at 50kHz will
deteriorate more rapidly because more acoustic noise is
generated at low frequencies.
4. If the decline in performance is sudden (not gradual), identify
the boat speed at which the onset occurred. Return the boat to
this speed, then gradually increase speed while making
moderate turns in both directions.
5. If the performance improves while turning to the side on which the
transducer is installed, it’s position probably needs adjustment.
The transducer is probably in turbulent or aerated water.
To improve performance, try the following, one at a time, in the
order given.
A. Increase the transducer’s angle in the water. Review “Shims”
and see Figure 5.
B. Move the transducer deeper into the water in increments of
3mm (1/8") (see Figure 1).
C.Move the transducer closer to the centerline of the boat.
Fill unused screw holes with marine sealant.
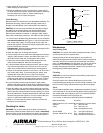
Stabilizing the Bracket
1. Prevent the bracket from moving out of position with the
remaining hex-washer-head screw. Drill the hole for the
stabilizing screw through the center hole of the bracket, any
shim(s), and the hull (see Figure 6).
3
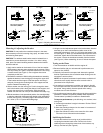
12° transom angle
13° angle
Figure 5. Adjusting the transducer angle
21° transom angle9° transom angle
parallel
slight angle
one
shim
three shims
taper down
slight angle
parallel
one shim
taper down
parallel
May improve operation
above 20kn (23MPH)
May improve operation
above 20kn (23MPH)
slight angle
two shims
taper down
slight angle
May improve operation
above 20kn (23MPH)
May improve operation
above 20kn (23MPH)
one
shim
taper down
more angle
Copyright © 2009 Airmar Technology Corp.
Figure 6. Screw locations on bracket
screw (4)
stabilizing
screw
Copyright © 2009 Airmar Technology Corp.
hole (2)
mate with
bosses
NOTE: Draw an “X”
at 21mm (1/2") from
the top and bottom
of both slots.
taper up
two shims
taper up
on shim