


GPSMAP 700 Series Installation Instructions 3
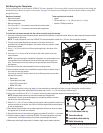
To install the bail-mount bracket without the cables routed through the bracket:
1. Using the included bail-mount bracket template, determine the best place to install the bracket. Be sure to leave adequate clearance behind
the chartplotter for the wiring.
NOTE: To avoid interference, mount the GPSMAP 700 series chartplotter at least 32 in. (813 mm) from a magnetic compass.
2. The bail-mount bracket template has adhesive on the back. Remove the protective liner and apply the template to the location at which you
want to install the bail-mount bracket.
3. Use a
1
/
8
in. (3 mm) drill bit to drill the four outer pilot holes marked on the template. Do not drill the two pilot holes marked on the cable-
organization bracket.
NOTE: If you are mounting the chartplotter in berglass, it is recommended to use a countersink bit to drill a clearance-counter bore through
only the top gel-coat layer. This will help to avoid any cracking in the gel-coat layer when the screws are tightened.
4. Remove the bail-mount bracket template from the mounting surface.
5. Secure the bail mount to the surface using the four included 35 mm M 4.2 × 1.4 screws.
NOTE: Stainless-steel screws may bind when screwed into berglass and overtightened. Garmin recommends applying an anti-galling,
stainless anti-seize lubricant to the screw before using.
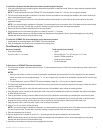
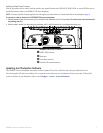
To install the GPSMAP 700 series chartplotter on the bail-mount bracket:
1. Loosely attach the mounting knobs to the GPSMAP 700 series chartplotter.
2. Slide the chartplotter onto the bail mount, and tighten the mounting knobs.
Flush Mounting the Chartplotter
Hardware (included):
• Flush-mount template
• Four 35 mm M 4.2 × 1.4 screws
Tools required (not included):
• Jigsaw
• Drill and drill bits—
3
/
8
in. (9.5 mm) and
1
/
8
in. (3 mm)
• Number 2 Phillips screwdriver
• Center punch and hammer
• File and sandpaper
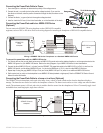
To ush mount a GPSMAP 700 series chartplotter:
1. The ush-mount template is included in the product box. Trim the template and ensure it will t in the location where you want to ush mount
the chartplotter.
NOTES:
Make sure the surface on which you mount the chartplotter has adequate open space behind it to t the chartplotter and the connected
cables, and make sure to leave approximately
1
/
2
in. (13 mm) of space on the right side of the chartplotter to access the SD card door and
sun cover.
To avoid interference, mount a GPSMAP 700 series chartplotter at least 32 in. (813 mm) from a magnetic compass.
2. The ush-mount template has adhesive on the back. Remove the protective liner and apply the template to the location at which you want to
mount the chartplotter.
3. Using a
3
/
8
in. (9.5 mm) drill bit, drill a pilot hole inside the corner of the template to begin cutting the mounting surface.
4. Using the jigsaw, cut the mounting surface along the inside of the solid line indicated on the ush-mount template. Use a le and sandpaper
to rene the size of the hole.
5. If the top and bottom mounting covers are attached to the front of the chartplotter, remove them by unsnapping the covers from the sides.
6. Place the chartplotter in the hole, and make sure that the mounting holes on the chartplotter line up with the pilot holes on the ush-mount
template after cutting, sanding, and ling the hole. If they do not line up, mark the locations where the pilot holes need to be.
7. Using the center punch, indent the center of each of the mounting-hole locations.
8. Using a
1
/
8
in. (3 mm) drill bit, drill the pilot holes.
NOTE: If you are mounting the chartplotter in berglass, it is recommended to use a countersink bit to drill a clearance-counter bore through
only the top gel-coat layer. This will help to avoid any cracking in the gel-coat layer when the screws are tightened.
9. Place the chartplotter into the cutout.
10. Securely tighten the four included 35 mm M 4.2 × 1.4 mounting screws through the chartplotter into the pilot holes.
NOTE: Stainless-steel screws may bind when screwed into berglass and overtightened. Garmin recommends applying an anti-galling,
stainless anti-seize lubricant to the screw before using.
11. Install the top and bottom mounting covers by snapping them into place.
•
•