


2 GPSMAP 400/500 Series Installation Instructions
Selecting a Mounting Location
Consider the following when selecting a location to mount your chartplotter:
• The location provides optimal viewing as you operate your boat.
• The location allows for easy access to the keypad on the chartplotter.
• The location is strong enough to support the weight of the chartplotter and protect it from excessive vibration or shock.
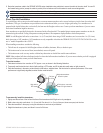
• Refer to the compass-safe distance table on page 10 to avoid interference with your magnetic compass.
• The location allows room for the routing and connection of the cables. There should be at least a 3 in. (8 cm) clearance behind the case.
Do not mount the chartplotter in an area that is exposed to extreme temperature or conditions. The temperature range for the chartplotter is
from 5°F to 131°F (from -15°C to 55°C). Extended exposure to temperatures exceeding this range (in storage or operating conditions) may cause failure
of the LCD screen. This type of failure and related consequences are not covered by the manufacturer’s limited warranty.
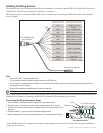
Mounting the Chartplotter
There are two mounting options for the chartplotter:
• —mount the chartplotter onto a bracket (included) that attaches to the console or overhead. The compact waterproof
chartplotter housing is suitable for mounting in exposed locations or at the navigation station.
• —use an optional ush mount kit to mount the chartplotter into a at panel. For more information on the optional ush mount
kit, visit www.garmin.com or contact your local Garmin dealer.
Surface-Mounting the Chartplotter
Use the included bracket to surface-mount the chartplotter. You will need the following tools and fasteners:
• Drill
• Phillips or at screwdriver
• Three #8 (4 mm) pan-head machine bolts with matching nuts and washers and a
5
/
32
in. (5 mm) drill bit, or three #8 pan-head self-tapping
screws and a
1
/
16
in. (1.5 mm) drill bit for drilling starter holes.
Use pan-head machine bolts or self-tapping screws to secure the swivel base. If you use screws with countersunk heads, you may damage the
mounting bracket.
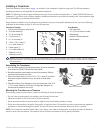
To mount the bracket assembly:
1. Usingtheswivelbaseasatemplate,markthelocationofthethreeholesthatsecurethebrackettothe
mountingsurface.
2. Drillthemountingholes.
• Ifyousecurethebasewithmachinebolts,drillthree
5
/
32
in.(5mm)holesatthelocationsyou
marked.
• Ifyousecurethebasewithself-tappingscrews,drillthree
1
/
16
in.(1.5mm)starterholesatthe
locationsyoumarked.Donotmakethestarterholesdeeperthanhalfthescrewlength.
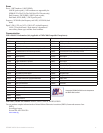
3. Securetheswivelbasewiththreeboltsorscrews.Donotovertightenthescrewsorbolts;youmay
damagetheswivelbase.
4. Placetheswivelmountbracketovertheswivelbaseandsecureitwiththeshortknob.
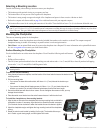
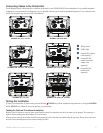
To install the chartplotter on the mounting bracket:
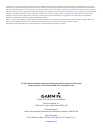
1.Aligntheslotonthebackofthechartplotterwiththelongmountingknob,andslidethe
chartplotterintoplace.Ifnecessary,adjusttheknobtospreadthebracketarmsapart.
(Turntheknobcounter-clockwisetowidenthebracketarmsandclockwisetotighten.)
2.Adjustthechartplotterangle,andtightenthelongmountingknobuntilthechartplotter
issnug.
3. Rotatetheswivelmountbracketbytwistingitleftorright.Thebracketclicksasyou
turnit.Selectagoodviewingangle,andthentightenbothknobs.
OK