


Page 395805 -95806
For technical questions, please call 1-800-444-3353.
Do not force the tool. Use the correct tool for your application. The correct
tool will do the job better and safer at the rate for which it is designed. Do not force
the tool and do not use the tool for a purpose for which it is not intended.
Check for any condition that may affect the tool’s operation. If damaged, have
the tool serviced before using. Many accidents are caused by poorly maintained
tools.
Make a test bend in scrap material before working on the workpiece. Make
sure you understand how and where the exact bend you want will happen.
Work on electrical conduit must meet all local, state and federal regulations.
Never attempt to bend pipe with wires or cables inside.
Be aware of both ends of conduit at all times. Be careful that the free ends of
conduit do not cause hazards to others or create a hazard to yourself, such as by
getting near electrical wiring.
WARNING! The warnings and cautions discussed in this manual cannot cover
all possible conditions and situations that may occur. It must be understood by the
operator that common sense and caution are factors which cannot be built into this
product, but must be supplied the operator.
UNPACKING
When unpacking, check to make sure that the item is intact and undamaged. If
any parts are broken, please call Harbor Freight Tools at the number shown on the cover
of this manual as soon as possible.
ASSEMBLY INSTRUCTIONS
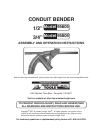
This Conduit Bender comes as one piece. The only additional piece needed is a
threaded 3/4” pipe handle (between 30” and 36” long) not included.
Insert the handle into the proper end of the bender and thread in place securely.
The bender is now ready for use.
OPERATION INSTRUCTIONS
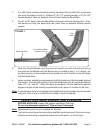
Note: Always test your desired bend on a piece of scrap material before attempting on a
workpiece. Bending properly takes a measure of experience. Techniques such as
offset bends and unbending take an exceptional degree of skill and are not covered
in this manual.
6.
7.
8.
9.
10.
11.
12.
1.
2.