


Page 495805 -95806
For technical questions, please call 1-800-444-3353.
For a 90° bend, measure the distance from the object that you start from to the point
you want the radius to end at. Subtract 5” (for 1/2” conduit bender) or 6” (for 3/4”
conduit bender) “take up” distance from this and make the Bend Mark.
For 45° or 30° bend, make the Bend Mark where you want the bend to start. Prac-
tice bends can help you determine how much take up distance different bends
require.
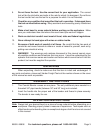
FIGURE 1
Line up Bend Mark
with this arrow.
Foot
Pedal
Measured End
Slide the Conduit Bender onto the piece of conduit you wish to bend and line up
the arrow on the Bender with the Bend mark you made in step 1 or 2, above. Ap-
ply light pressure to the handle and foot pedal and verify that the arrow still aligns
with the Bend Mark.
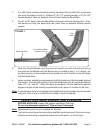
Apply constant, simultaneous pressure to both the handle and the foot pedal to bend
the conduit. Cast into the surface on the Conduit Bender you will see three different
lines: 30°, 45°, and 90°. When the bend is complete, the line beside the desired
degree of angle will be exactly perpendicular to the piece of conduit on the floor.
Note: If simultaneous force is not applied to the handle and the foot pedal, then the conduit
may kink. Do not use a conduit that is kinked or bent too sharply.
INSPECTION, MAINTENANCE, AND CLEANING
BEFORE EACH USE, inspect the general condition of the tool.
Do not use damaged equipment. Discard tool if damaged.
Note: Replacement parts are not available for this item.
Tool service must be performed only by qualified repair personnel. Service or main-
tenance performed by unqualified personnel could result in a risk of injury.
1.
2.
3.
4.