


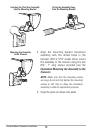

7. Locking Down the Transducer (Optional)
NOTE: You have the option to lock down the Two Piece Kick Up bracket if you do
not want the transducer to kick up. Please be aware, however, that the transducer
can be damaged if it is locked down and it strikes debris in the water.
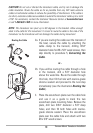
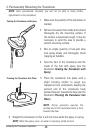
1. To lock down the transducer, trace the
position of the mounting bracket. Force the
pivot to the Up position to gain access to the
mounting screws, then re-align the mounting
bracket against the transom of the boat to
match the traced silhouette. Check the
bracket position with the level again to make
sure it is still level, then mark the fourth
mounting hole using a pencil or marker (see
the illustration Using the Mounting Bracket
to Mark the Initial Drill Holes). Unscrew and
remove the mounting screws and the
transducer assembly and set aside.
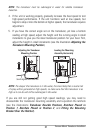
2. Drill the fourth mounting hole, using a 9/64"
drill bit. Use a marine grade silicone sealant to
fill all four drilled mounting holes, especially if
the holes penetrate the transom wall.
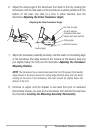
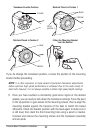
3. Re-position the transducer assembly against
the transom of the boat, then hand install the
first three screws (two on the outside edges
and one in the 3rd mounting hole). Make sure
that the transducer location and the pivot
angle have not changed, then fully tighten all
three mounting screws (see the illustration
Fully Tighten All Three Mounting Screws).
Hand-tighten only! Snap the pivot back down.
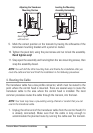
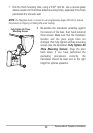
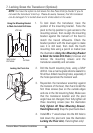
4. Install #8 x 1" wood screw into the 4th hole to
lock down the pivot arm (see the illustration
Locking the Pivot Arm). Hand-tighten only!
Locking the Pivot Arm
Using the Mounting Bracket
to Mark the Initial Drill Holes
Mark Initial
Drill Holes
4th hole
3rd hole
24
Transom Mount Transducer Installation