


2. Improper installation of the transducer can alter the efficiency and accuracy of the entire
system.
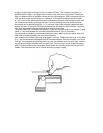
3. If your boat or transducer is out of the water for a period of time, it may take a short
period of time for the transducer to become thoroughly "wetted" when returned to the
water. Also, re-entry may cause the turbulence which will create air bubbles on the "eye"
of the transducer. The bubbles will disappear in a short time or can be removed by
rubbing the transducer "eye" with your fingers while the transducer is in the water.
4. If your instrument should fail to function, be sure to check all the electrical connections
before removing the transducer or calling a serviceman.
5. Inspect your transducer cable and make sure that it has not been cut or damaged to the
point where it will affect the performance of the transducer. A slight nick or cut, exposing
the outer cable, can be repaired by wrapping with electrical tape. A transducer can be
damaged if the inner cable and outer cable are allowed to make contact. Such a problem
can sometimes be corrected by properly splicing the coaxial cable. This should only be
attemped by a qualified service technician.
6. If your unit is not working properly and you suspect the problem might be in your
transducer, we would recommend you borrow a unit from a friend and try it on your boat.
If the symptoms are the same, you can almost be assured that the problem is in the
transducer.
TRANSOM MOUNTING PROCEDURE
Step 1
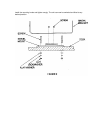
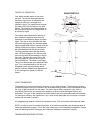
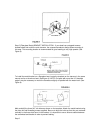
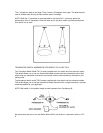
MOUNTING LOCATION - It is important that the transducer be mounted on the transom where
water flow is in constant contact with the transducer. You may wish to observe the rear of the
boat while it is moving through the water to determine the best mounting location.
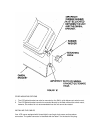
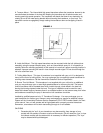
Step 2 (Aluminum Boats)
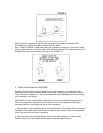
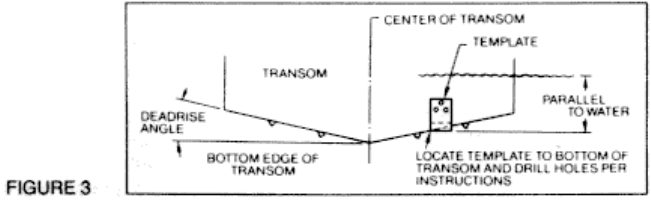
BRACKET INSTALLATION To install the metal bracket on an aluminum boat locate the template
on the transom between rows of rivets, or ribs that are on the bottom of the boat. NOTE:
Template is on the last page of the manual. Align the template so that the bottom corner of the
template nearest the center of the transom is on the bottom edge of the transom. (See figure 3.)
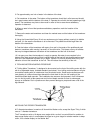
Once the location is determined mark and drill three 7/64" dia holes noted on the template. Attach
the metal bracket using three #10 self threading screws supplied. Be sure to align holes in the
center of the bracket slots. On some aluminum boats it may be necessary to use a wood back-up
plate. It is important to use a silicone sealant between the screwhead and bracket in order to
prevent leaking. (See Figure 4).