


●
Do not install it where there are unusual heating
conditions, such as: in direct sunlight; near a lamp,
television, radiator, register, or fireplace; near hot water
pipes in a wall; near a stove on the other side of a wall.
●
Do not locate in unusual cooling conditions, such as:
on a wall separating an unheated room; or in a draft from
a stairwell, door, or window.
●
Do not locate in a damp area. This can lead to
corrosion that will shorten thermostat life.
●
Do not install the unit until all construction work and
painting has been completed.
W A R N I N G:
●
Read instructions carefully before removing any wiring
from an existing thermostat.
●
Label wires before they are removed.
●
When removing wires from their terminals, ignore the
color of the wires since they may not comply with any
standard.
4.3 REMOVAL OF OLD UNIT
1. Switch electricity to the furnace and air conditioner
OFF; then proceed with the following steps.
2. Remove cover from old thermostat. Most are snap-on
types and simply pull off. Some have locking screws on
the side. These must be loosened.
3. Note the letters printed near the terminals. Attach
labels (enclosed) to each wire for identification. Label and
remove wires one at a time. Make sure the wires do not
fall back inside the wall.
4. Loosen all screws on the old thermostat and remove it
from the wall.
4.4 MOUNTING
5. Strip insulation 3/8 in. (9.5mm) from wire ends and
clean off any corrosion.
6. Fill wall opening with non-combustible insulation to
prevent drafts from affecting the thermostat.
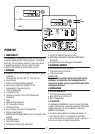
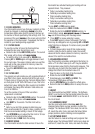
7. With each thumb on a release tab at the bottom of the
body, and fingers over the top of the unit. Release the
unit from its base plate by squeezing the tabs into the
body.
8. Separate the unit from its base plate by pulling the
body outward at its bottom.
C A U T I O N:
●
Be careful not to drop the unit or disturb electronic parts.
●
Leave the door closed while the body is being removed
from the base.
9. Route the wires through the open areas in the base
plate above the terminals. Hold the base against the wall,
with the wires coming through. Position the base for the
best appearance (to hide any marks from an old
thermostat). Attach the base to the wall with the two
screws provided.
N O T E : If you are mounting the base to a soft material like
plasterboard or if you are using the old mounting holes, the
screws may not hold. Drill a 3/16-in. (4.8mm) hole at each
screw location, and insert the plastic anchors provided. Then
mount the base as described below.
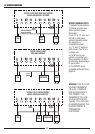
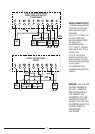
4.5 WIRING
10. Using the terminal descriptions below, wiring
diagrams on pages 10-11, and your labels, determine
appropriate wiring for you system.
11. If you are unsure or need assistance, call the LUX
Technical Assistance Dept.
(see
TECHNICAL ASSISTANCE
.)
4.5.1 TERMINAL DESCRIPTIONS
RH:
Provides power for heating terminals.
RC:
Provides power for cooling and fan terminals.
B:
Energized at any time the unit is in Heat mode.
O:
Energized at any time the unit is in Cool mode.
W1:
Energized while the thermostat is calling for a first
stage of heat.
W2:
Energized when the thermostat is calling for a
second stage of heat.
Y1:
Energized while the thermostat is calling for a first
stage of cooling.
Y2:
Energized when the thermostat is calling for a
second stage of cooling.
G:
The fan terminal is energized at any time the
thermostat attempts to turn the blower on.
C:
Usage of this terminal permits the thermostat to be
powered by the system, instead of (or in addition
to) batteries alone.
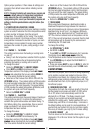
4.5.2 CONNECTING THE WIRES
12. Loosen wire clamp screws just enough to slide wire
under the black top part of the clamp.
13. Connect stripped wire ends, by
trapping it between its black clamp and
brass terminal. Then tighten its terminal
screw.
14. Tape the ends of any unused wires.
4.6 COMPLETING YOUR INSTALLATION
15. Install two new Energizer
®
or DURACELL
®
"AA" size
alkaline batteries at this time. For instructions, refer to
BATTERIES/MAINTENANCE.
16. Configure your thermostat at this time. Refer to
SETUP OPTIONS.
17. Install your thermostat on its base. To do this hang
the top of the unit by the tabs on the base, then snap the
bottom of the unit into place. Do not use unnecessary
force. If the body does not snap into place easily, remove
the body, re-hang it from the tabs and try again.
18. Turn the power back on to your heating and/or air
conditioning system.
3