


12
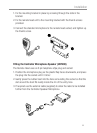
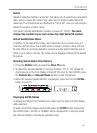
Disconnecting the Remote Head/Speaker Controller Microphone
It is recommended that the remote head be left permanently connected to the
radio, but if it must be disconnected, proceed as follows:
1. Lift the rubber boot and the lip of the raised area on the front panel.
2. Ease the rubber boot out of the cable entry hole and slide it along the cable
away from the front panel.
3. Identify the plug locking lever, move the lever towards the plug body. At the
same time gently pull the plug from the socket (see previous page).
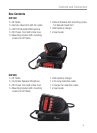
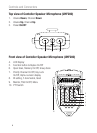
Controller Speaker Microphone; part number, CSPKMIC
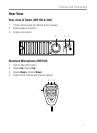
Standard Microphone; part number, MIC050
These can be purchased from the dealer you purchased the radio from or
directly from Oricom.
DC Power Connection
The Radio is designed for 13.8 Volt DC, negative earth installations only (i.e.
where the negative battery terminal connects to the chassis of the vehicle).
For installation on 24 volt systems an inverter (not supplied) will need to be
used.
There are two possible methods of installation.
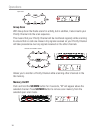
Over voltage protection
The radio has a high voltage input detection system, to warn you if an
overvoltage situation occurs.
Eg.: If the power supply voltage exceeds 17volts DC, the channel display (LCD
backlight) will ash in 3 different colors when the unit is turned on.
In additon, when transmitting, the TX indicator will automatically select a low
power output.
If the overvoltage warning appears, you must switch your radio off and
disconnect it from the power source, before locating the cause of the trouble.
The power source must not exceed 30volts.
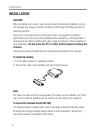
Installation