5.0 SECOND STAGE PROCEDURES
5.1 TOOLS REQUIRED FOR SECOND STAGE SERVICING
– Two good quality 6" or 8" (15 or 20 cm) adjustable wrenches
– #10 Torx screwdriver
– Small Phillips ACR Screwdriver
– Size 0 Square Drive (Robertson Head) screwdriver
– Side cutting pliers
– Sherwood In-line Adjusting Tool ( p/n TL102 )
– Sherwood Plastic Probe (p/n TL111) to push out orifice
– Sherwood Lever Height Adjusting Tool (p/n TL123)
5.2 DISASSEMBLY OF SECOND STAGE
To view the complete parts list of the second stage, fold out the back cover of this manual.
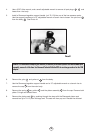
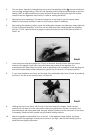
1. Pull back the hose protector from the inlet end ferrule. Remove the hose assembly
from the orifice housing . Inspect the hose assembly for any cuts or cracks, especially on
the hose at the metal ferrules. Replace the hose assembly if any cuts or cracks are found.
2. Remove the mouthpiece by cutting the mouthpiece tie with side cutting pliers. Discard
the old mouthpiece tie. Examine the condition of the mouthpiece. Pay particular attention to
the area on top just behind where the old tie tightened. This is a prime area for small holes to
develop. If the mouthpiece is in good condition, it can be reused.
3. Remove the exhaust tee retaining screw with a Phillips or Square Drive screwdriver.
4. Remove the exhaust tee from the case by pulling it back and off the top edge.
5. Remove the front cover from the case by turning the bezel ring by hand. Some older units
(manufactured before 1986) have a metal bezel ring with a small metal locking tab in the
mouthpiece area. Remove this ring with a small slotted screwdriver.
A. Purge Button Change:
12
5
27
14
19
18
15
26
22
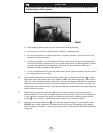
WARNING
NEVER tighten the hose fitting to the first stage with more than 40 in. lbs. (4.5 joules) of
torque. The inlet hose fitting can be weakened by overtightening.
NOTE
: At this point, the purge button can be removed from the cover. This will be necessary
oonnllyy
if the
button travel is impeded by silt deposits, or if the logo is to be changed to a different color. If it is
necessary to remove the purge button, follow the next sub-steps A to E. Otherwise, go on to Step 6.
1


