


2
www.sherwoodscuba.com
Working conditions
Service should be performed in a well lighted, clean area with access to proper tools. Use of improper tools
or techniques may cause permanent damage and void the warranty.
Service Procedure
The standard service procedure involves disassembly, inspection, cleaning, reassembly and adjustment of the
regulator. As each step of the process is performed check the parts for damage or distortion. Replace parts
that appear to have sustained damage.
Cleaning can normally be performed by rinsing with the aid of mild detergent and a soft brush
followed by a thorough rinsing with fresh water. Use of an ultrasonic cleaner and commercially available
solutions can accelerate this process. Be certain to check with the supplier of the solution for compatibility with
respiratory equipment. Thorough rinsing should always follow the use of any cleaning agents.
O-rings should be lightly lubricated with Crysto-Lube MCG 111 before installation. Avoid the use of
silicone spray or other lubricants containing hydrocarbons.
Disassembly
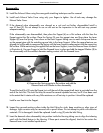
1. Pull back the hose protector (26) and inspect the hose for signs of cuts, cracks or other damage. A
damaged hose should be replaced.
2. Remove the Dual Octo assembly from the first stage regulator at the hose connection with a 9/16"
(14 mm) wrench.
3. Use a 3/4" (19 mm) wrench to support the Inlet Fitting (1) and 5/8"(16mm) wrench to separate the
swivel end of the hose from the Inlet Fitting. Do not allow the Inlet fitting to rotate within the Housing (10),
as this may cause damage to the Housing.
4. Inspect the o-rings (18 and 20) at the both ends of the hose for signs of wear or damage. If these are
damaged they should be replaced. Use only a nonmetallic or a soft brass instrument to remove the o-
rings. Use of other tools and carelessness may cause damage to the sealing surfaces on the hose fittings
requiring replacement of the entire hose. Sherwood does not recommend replacement of the o-ring at
the swivel end of the hose if it does not show evidence of wear or damage.
5. Remove the Mouthpiece (12) by cutting the Mouthpiece Strap (13) with side cutting pliers. Be careful
not to cut or damage the Mouthpiece. Discard the strap and examine the Mouthpiece for cuts or tears.
If there is damage it should be replaced.
6. Remove the Cover Ring (24) by unthreading it from the Housing by hand. Tools should not be
necessary and could cause damage to the Cover Ring. If it is difficult to remove, soak the entire
regulator in warm water for a few minutes to loosen mineral deposits. Remove the Purge Cover (23)
and Diaphragm Retainer (22).
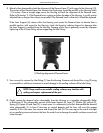
7. Gently remove the Diaphragm (21) from the Housing. Hold the Diaphragm up to a light source
and gently stretch to search for tears or pin holes. If any are found replace the Diaphragm. If it is
undamaged it may be reused.