


6
www.sherwoodscuba.com
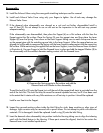
20. Hold the demand valve subassembly in place and install the Inlet Fitting. Hand tighten (approximately
40 in lbs). As the Inlet Fitting is installed the Demand Lever position will change and it will be loosely
retained until the final adjustment is made.
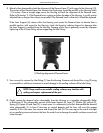
21. Use the nut driver to tighten the Lock Nut until the Demand Lever rises to be level with the top of
the Housing.
22. Install the LP Hose (19) onto the Inlet Fitting. Be certain to secure the Inlet Fitting with a wrench as the
hose fitting is tightened (40 in-lbs).
23. Attach the LP Hose to the first stage regulator and torque to 40 in lbs.
24. The Dual Octo is designed to be compatible with regulators that operate with an intermediate pressure
ranging from 120 to 150 PSI. If the first stage is not operating within these pressures, the Dual Octo
may not perform properly. If necessary, service the first stage regulator so that it operates within these
pressures or match the Dual Octo to a first stage that does operate within the prescribed limits.
25. Apply pressure to the regulator assembly and tighten the Lock Nut until a very slight leak is presented.
Loosen the Lock Nut slowly until the leakage stops. Continue loosening approximately 1/8 turn. The
Demand Lever should be aligned with or slightly below the surface of the top of the Housing and should
allow slight movement of the lever without opening the valve. If the correct alignment is not present
continue loosening the Lock Nut until alignment is achieved, but do not loosen the Lock Nut more than
1/4 turn past the point where leakage is stopped. If alignment cannot be achieved it is likely the Demand
Lever is distorted and must be replaced.
26. Install o-ring (14) on to the Mouthpiece Boss.
27. Install the Mouthpiece Boss into the Housing noting the desired orientation of the Mouthpiece. There
are two positions available and the selection should match the user’s choice. Use snap ring pliers to
spread the Retaining Ring (15) and position it over the groove on the Mouthpiece Boss. After the
Retaining Ring is released, check to verify that it contained in the groove. Pull on the Mouthpiece Boss to
check retention.
28. Install the Mouthpiece (12) and secure with the Mouthpiece Strap (13).
29. Install the Diaphragm, Retainer and Purge Cover with the Sherwood logo aligned parallel with the axis
of the Inlet Fitting.
CAUTION – Rotation of the Inlet Fitting within the Housing will damage the
indexing feature and may cause the Demand Lever to misalign. This could
compromise regulator performance and will require replacement of the Housing.
WARNING – Failure to properly secure the Mouthpiece Boss to the Housing may
result in separation during a dive. If this were to occur the diver may be exposed
to inhalation of water causing a potentially hazardous condition requiring an
appropriate emergency response to avoid serious injury or death.