


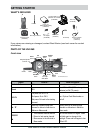
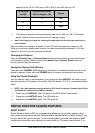

E-11West Marine VHF460 Radio Owner’s Manual
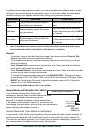
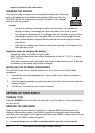
The antenna detaches from the radio for easy shipping or storage. To attach the antenna to
your radio, screw it tightly onto the anchor post at the top of the radio.
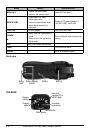
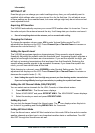
Your radio comes with a rechargeable Lithium Ion battery; for shipping safety, the battery is
not installed at the factory. An empty auxilliary battery tray is installed as a placeholder.
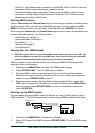
1. Insert the hook on the battery into the notch at the top of the battery compartment.
#
2. Lower the battery until it rests at in the compartment.
3. Bring the battery latch up and snap it into place.
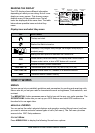
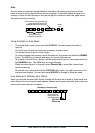
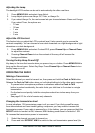
The radio also comes with an auxilliary battery tray that holds four AAA-type NiMH
rechargeable batteries (not included). You can use rechargeable batteries as a backup
when the Li-Ion battery gets low and needs to be charged.
# rechargeable
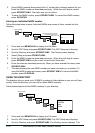
Follow these steps to use the accessory battery tray:
1. Hold the lower part of the tray in one hand with the three battery contacts facing
down. Use your thumb to hold the notch on the lower part of the tray.
2. With your other hand, grip the upper part of the tray and lift the cover open.
3. Align the batteries’ positive and negative terminals with the drawing on the case and
snap each battery into place.
4. Insert the two hooks on the lower part of the tray into the notches on the cover; close
the cover. (The cover ts snugly but you should not have to force it closed.)
5. Install the auxilliary battery tray in your radio just as you do the Li-Ion battery (see
page E-11).
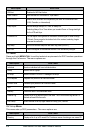
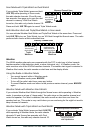
You can mount the charger on any at surface.
1. Use the two holes at the base of the charger as a template to mark the drill holes.
2. Using a 1/8-inch (or 3 mm) drill bit, drill two holes 1/2 inch (13mm) deep.
3. Use the provided screws to attach the charger to the surface.
#