SwitchLinc V2 Dimmer 1000W User’s Guide
3. Send an X10 ON or OFF command.
4. Send the following X10 Address sequence:
5. Send the X10 Scene Address (house code and unit code) that is to be removed.
6. SwitchLinc Dimmer will flash the light it is wired to and blink an LED in its LED Bar, indicating that the
X10 Scene Address has been removed.
Remotely Setting the Ramp Rate for an X10 Scene Address
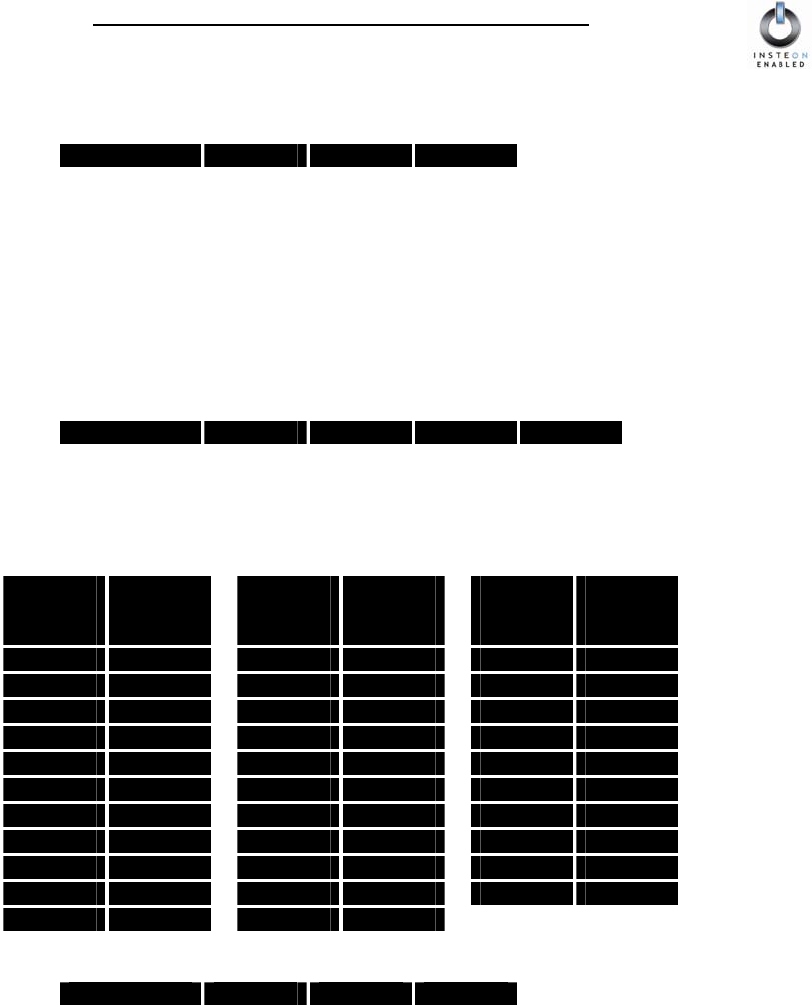
The Ramp Rate of each module in each X10 Scene is adjustable. If this setting is not adjusted,
SwitchLinc Dimmer will use the Ramp Rate for its X10 Primary Address.
1. Using an X10 Controller, send the CLEAR Sequence:
2. Send SwitchLinc Dimmer's X10 Primary Address (house code and unit code).
3. Use any controller to adjust SwitchLinc Dimmer’s brightness so it corresponds to the Ramp Rate you
want in the table below. If you use SwitchLinc Dimmer’s paddle and you are careful, you can still set
one of 32 brightnesses even though there are only 9 LED brightness indicators. Brighter is faster.
4. Send the following X10 Address sequence:
O16 P16 M16 N16
O16 N16 M16 P16 M16
Bright-
ness
Level
Ramp
Rate in
Seconds
Bright-
ness
Level
Ramp
Rate in
Seconds
Bright-
ness
Level
Ramp
Rate in
Minutes
100% 0.1 65% 26 29% 2.5
97% 0.2 61% 28 26% 3.0
94% 0.3 58% 30 23% 3.5
90% 0.5 55% 32 19% 4.0
87% 2.0 52% 34 16% 4.5
84% 4.5 48% 38 13% 5
81% 6.5 45% 43 10% 6
77% 8.5 42% 47 6% 7
74% 19.0 39% 60 3% 8
71% 21.5 35% 90 0% 9
68% 23.5 32% 120
N16 O16 P16 M16
5. Send the X10 Scene Address (house code and unit code).
6. SwitchLinc Dimmer will flash the light it is wired to and blink an LED in its LED Bar, indicating that the
new Ramp Rate has been set for the X10 Scene Address.
Page 26 of 36


