


8 MULTIPLE WIRELESS SENSORS
The main unit supports up to three wireless sensors. Each additional wireless sensor
must be designated a different channel number. Assigning different channel numbers
differentiate each sensors temperature and hygrometer readings for the main units’
display.
Additional wireless sensors are sold separately. Call 1-800-556-2548 to order.
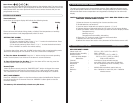
WIRELESS SENSOR MODEL # 01022
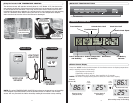
1) Open each sensor by removing the 4 screws and the cover.
2) Install batteries, see section 3.
3) Use the interior slide switch to select a channel – 1, 2, or 3.
4) Choose Celsius or Fahrenheit with the C/F button, for the sensor display.
5) With the “MODE” button choose what you want the sensor display to show:
Temperature only,
Humidity only, or
Temperature and humidity, alternating.
6) Press the “TX” button to send a signal to the base station.
7) Replace the cover and the 4 screws.
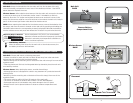
8) Mount the sensor. See section 4 for placement of the wireless sensor unit.
9 8
9 PRODUCT SPECIFICATIONS MODEL#00592W
MEASUREMENT RANGE:
Indoor main unit : 0º C to + 50º C (+32º F to +122º F)
Outdoor/Indoor humidity : 20% - 99% RH
Wireless sensor : -20º C to +70º C (-4º F to +158º F)
with low-temp adaptor : -30º C to +70º C (-22ºF to +158º F)
Barometer : 900 to 1050 mb/hPa
Channel : maximum of three wireless sensors
Transmission : up to 30M (100 ft.) open area, RF434 MHz
Resolution : 0.1º for temperature, 1% for humidity, 1 hPa
mb for pressure
Clock : WWVB radio-controlled, quartz back-up
Batteries : AA x 2 alkaline for main unit; AA x 2 alkaline
for wireless sensor
Moon Phase:
The moon phase will automatically display based on the calender date. The moon phase
display will scroll from left to right, and pause for about 5 seconds to display the current
moon phase. NOTE: the moon phase will not be correct unless the date and year are
programmed correctly.
OTHER ADJUSTMENTS
Trend Indicators:
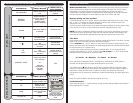
Arrow icons in the upper display will indicate the following trends:
Rising Steady Falling
The arrow icons will indicate rising, steady or falling if the temperature or humidity
change is more than 1 unit (degree/percent) within an hour.
SETTING THE ALARM:
1) Hold “ALARM” for 3 seconds.
2) The hour number(s) flash. Press “+” or “-” to enter the desired hour. Press
“ALARM” to confirm the hour setting.
3) The minute number(s) flash. Press “+” or “-” to enter the desired minute.
Press “ALARM” to confirm the minute setting.
To view the alarm time, press the “ALARM” button during the normal operating mode.
Alarm time will display for five seconds. Then, the current time is displayed.
To Turn the Alarm On and Off: Press the “+” button during the normal operating
mode. The bell (alarm) icon will show if the alarm is set and activated.
To Turn off the Alarm for One Day: To turn the alarm off for one day, press the
“ALARM” button when the alarm sounds
Snooze/Light:
When the alarm sounds, press the “SNOOZE/LIGHT” button to trigger the snooze
feature. The alarm is silenced for five minutes. Then, it will sound an alarm again.
The “SNOOOZE/LIGHT” button also activates the built-in backlight for 5 seconds.
MIN / MAX MEMORY:
Press the “MEMORY” button to view the maximum values (Inside/Outside Tempera-
ture and Humidity) for 5 seconds. Press the “MEMORY” button again to view the
minimum memory.
The memory will automatically refresh every 24 hours.