


11
However, the shoot-thru-hull installation does have its drawbacks.
First, some loss of sensitivity does occur, even on the best hulls. This
varies from hull to hull, even from different installations on the same
hull. This is caused by differences in hull lay-up and construction.
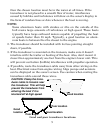
Second, the transducer angle cannot be adjusted for the best fish
arches. This can be a problem on some hulls that sit with the bow high
when at rest or at slow trolling speeds. Follow the procedure listed in
the shoot-thru-hull installation section at the end of this lesson to de-
termine if you can satisfactorily shoot through the hull.
TRANSOM TRANSDUCER ASSEMBLY AND MOUNTING
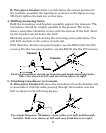
The best way to install these transducers is to loosely assemble all of
the parts first, place the transducer's bracket against the transom and
see if you can move the transducer so that it's parallel with the ground.
The following instructions sometimes vary depending on the mounting
bracket that came with your transducer. Single-frequency Skimmers
come with a one-piece stainless steel bracket, while dual-frequency
Skimmers come with a two-piece plastic mounting bracket. Use the set
of instructions that fits your model.
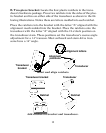
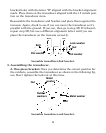
1. Assembling the bracket.
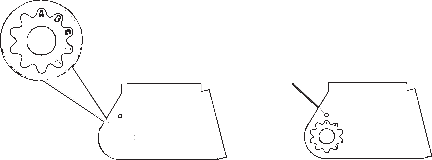
A. One-piece bracket: Press the two small plastic ratchets into the
sides of the metal bracket as shown in the following illustration. Notice
there are letters molded into each ratchet. Place each ratchet into the
bracket with the letter "A" aligned with the dot stamped into the metal
bracket. This position sets the transducer's coarse angle adjustment for a
14° transom. Most outboard and stern-drive transoms have a 14° angle.
Align plastic ratchets in bracket.
Dot