


2 GPSMAP 4000/5000 Series Installation Instructions
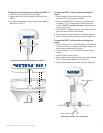
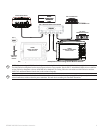
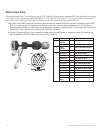
To install the bail mount and unit:
1. Using the bail mount as a template, mark the location of the four mounting holes. Be sure to leave at least 5" (12.7 cm) of clearance
behind the unit for the wiring.
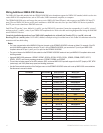
Mount a 4008/4208/5008/5208 unit 31
1
/
4
" (80 cm), and a 4012/4212/5012/5212 unit 39
3
/
8
"
from a magnetic compass to avoid interference.
2. Using an appropriately sized drill bit, drill the pilot holes for your mounting hardware.
3. Secure the bail mount to the surface with your mounting hardware.
4. Loosely attach the mounting knobs to the GPSMAP 4000/5000 series unit.
5. Slide the unit onto the bail mount, and tighten the mounting knobs.
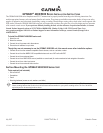
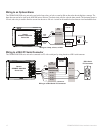
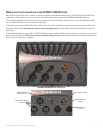
Flush Mounting the GPSMAP 4000/5000 Series Unit
Hardware (included):
• Flush mount template
• Four threaded 4 mm mounting studs
• Four4mmatwashers
• Four 4 mm lock washers
• Four 4 mm nuts
Tools required (not included):
• Jig saw
• Masking tape
• Scissors
• Drill
• Drill bits—
3
/
8
" (6 mm) and 4 mm
•
1
/
16
" (2 mm) Allen (Hex) wrench
• 4 mm sockets or wrenches
• Center punch and hammer
July 2007 190-00779-03 Rev. B Printed in Taiwan
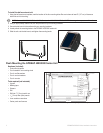
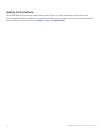
GPSMAP
®
4000 SERIES FLUSH MOUNT TEMPLATES
GPSMAP 4008/4208
USE 4 mm DRILL BIT
Pilot Hole
3/8" (9.5 mm)
6 17/32"
(165.90 mm)
9 5/8" (244.50 mm)
CUT ON
THIS LINE
Recommended clearance
for SD card door
1/2"
13 mm
Unit dimensions: 11 3/16" (284.4 mm) wide x 6 31/32" (176.9mm) high
190-00779-03_0B.indd 1 7/9/2007 10:08:51 AM
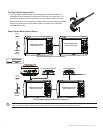
Flush Mount Template Example (not to scale)