


GPSMAP 6000/7000 Series Installation Instructions 17
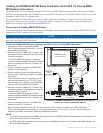
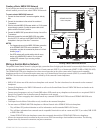
After the power cable and the GPS antenna (as well as any optional Garmin Marine Network devices, NMEA 0183 devices, NMEA 2000
connections, or video connections) are wired to the boat, connect the cables to the GPSMAP 6000/7000 series chartplotter.
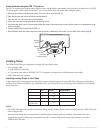
Note: You must install the locking rings before connecting the cables to the chartplotter (page 6).
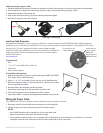
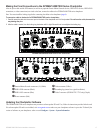
1. Carefullypressthecableintothecorrectportonthebackofthechartplotteruntilitisrmlyseated.
.
2. Afterthecableisseated,turnthelockingringclockwiseuntilitistight.Becarefulnottoovertightenthelockingring.
➊
➊
➊
➋
➌
➍
➎
➏
➊
➊
➊
➋
➌
➍
➎
➏
➐
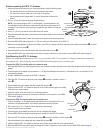
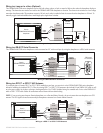
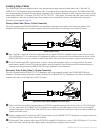
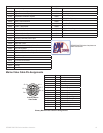
➊
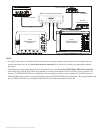
Garmin Marine Network connectors (3) (Black)
➋
NMEA 2000 connector (Black)
➌
NMEA 0183 connector (Blue)
➍
Power connector (Red)
➎
Video connector (Yellow)
➏
Grounding lug (unused in a typical installation)
➐
Video 2 connector (GPSMAP 7015/7215 only) (Purple)
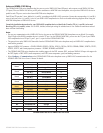
The GPSMAP 6000/7000 series chartplotter may contain a software update SD card. If so, follow the instructions provided with the card.
If a software update SD card is not included, visit www.garmin.com to make sure your chartplotter software is up-to-date. To identify the
version of software on your chartplotter, select or touch > >