


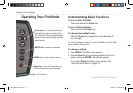

Fishnder 90/140 Owner’s Manual 9
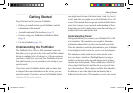
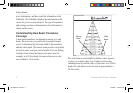
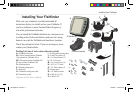
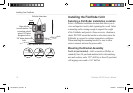
Installing Your Fishnder
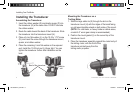
To mount the transducer on a transom:
1. Position the transducer mount at the selected transom
location. Make sure the transducer is parallel with the
water line. Mark the center locations of each hole on the
transducer mount. (See the gures on the next page.)
2. Using a 5/32" bit, drill the pilot holes approximately 1"
(25 mm) deep at the marked locations. To avoid drilling
the holes too deep, wrap a piece of tape around the bit
at 1" from the point of the bit.
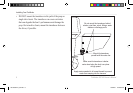
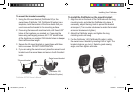
3. Apply marine sealant to the 5 x 30 mm screws. Attach
the transducer assembly to the transom using the 5 x 30
mm screws. Adjust the transducer assembly to extend
beyond the bottom of the transom approximately 1/8"
(3 mm) on berglass hulls or 3/8" (10 mm) on aluminum
hulls. Adjust the transducer assembly to be aligned
parallel with the water.
4. Tighten the 10-32 locking nut until it touches the
mounting bracket, and then tighten 1/4 turn more. (Do
not overtighten.)
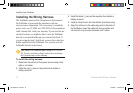
5. Place the rst cable clamp on the transducer cable
approximately one third of the distance between the
transducer and the top of the transom. Mark the location.
Using a 1/8" bit, drill a pilot hole approximately 3/8" (10
mm) deep.
6. Attach the cable clamp using a 4 x 12 mm screw. Coat
the screw with marine sealant before installation. Repeat
steps 5 and 6 using the other cable clamp.
7. Route the transducer cable, as needed, to the Fishnder.
DO NOT CUT THE CABLE. Avoid routing the cable with
electrical wires or other sources of electrical interference.
190-00582-10_0A.indd 9 12/2/2011 3:08:58 PM