


6 Fishfinder 90/140 Owner’s Manual
INSTALLING YOUR FISHFINDER > INSTALLING THE TRANSDUCER
Installing the Transducer
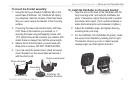
Assembling the Transducer
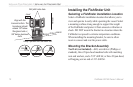
1. Insert the rubber washer (Q) and plastic spacer (P)
into the transducer (G) at the same time. DO NOT
lubricate the rubber washer.
2. Route the cable toward the back of the transducer.
Slide the transducer into the transducer mount (H).
3. Place a 5 mm flat washer (J) on the 10-32 x
1.75" screw (N), and insert the screw through the
transducer mount, spacer, and rubber washer.
4. Place the remaining 5 mm flat washer on the
exposed end. Install the 10-32 lock nut (L) finger
tight. You can tighten the transducer further after
installation on the boat.
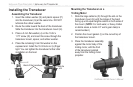
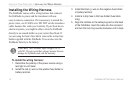
Mounting the Transducer on a
Trolling Motor
1. Slide the large cable tie (S) through the slot on the
transducer mount (H) with the ridges of the band
facing up until equal lengths extend on both sides of
the mount. (NOTE: For cold water, or heavy timber
or debris areas, a metal 4-5" worm gear clamp is
recommended.)
2. Position the mount gasket (I) on the curved top of
the transducer mount.
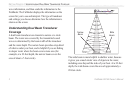
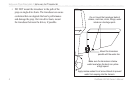
3. Place the transducer assembly
against the motor body of the
trolling motor, with the front
of the transducer pointed
away from the trolling motor
propeller.
Back of the transducer
Cable tie
slot