


Fishfinder 90/140 Owner’s Manual 1
GETTING STARTED > UNDERSTANDING THE FISHFINDER
GETTING STARTED
To get the most out of your new Fishfinder:
• Before you install and use your Fishfinder, read the
information in this manual.
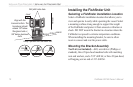
• Assemble and install the hardware (page 5).
• Practice using your Fishfinder in Simulator Mode
(page 4).
• Use the Fishfinder (page 13).
Understanding the Fishfinder
The Fishfinder 90 or 140 is a fully automatic sonar unit
that allows you to go out on the water and find fish without
having to configure a lot of settings; or, if from experience
you know exactly how you want your Fishfinder screen to
look and function, you can customize each setting to your
specific needs.
If you have used a Fishfinder before, and you know how
to interpret the sonar information on the screen, you can
skip this section. If you have not used a Fishfinder before,
you might want to learn a bit about sonar: what it is, how it
works, and what you might see on the Fishfinder 90 or 140
screen. This manual does not go into technical detail about
sonar, but it can give you a general understanding of those
things that you need to know about sonar that can help you
interpret the screen and find the fish.
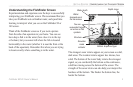
Understanding Sonar
During installation, you connect your Fishfinder 90 or 140
to a transducer. The transducer uses sound to determine
information about what is in the water beneath your boat.
Then the transducer sends the information to your Fishfinder
to be displayed on the screen for you to view and interpret.
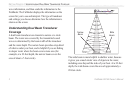
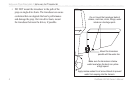
The transducer sends sound waves down into the water
in a cone shape, similar to a flashlight beam (covering a
smaller circular area at the top and angling out to a larger
circular area at the bottom). These sound waves reflect off
of any object that they hit, and then the waves travel back
up to the transducer. These objects could be fish, branches,
the bottom, or any other object that has density that is
different from the water. The transducer receives the sound