


307985 13
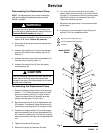
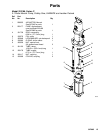
Service
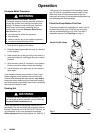
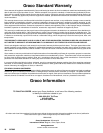
Disconnecting the Displacement Pump
NOTE: For displacement pump repair instructions,
refer to the separate displacement pump manual
307983, supplied.
WARNING
To reduce the risk of serious injury whenever you
are instructed to relieve pressure, always follow the
Pressure Relief Procedure on page 8.
1. Flush the pump if possible. Stop the pump at the
bottom of its stroke. Relieve the pressure.
2. Disconnect all hoses and remove the pump from
its mounting.
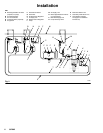
3. Unscrew the coupling nut (14) from the displace-
ment rod (R). Remove the coupling collars (15).
See Fig. 4.
4. Unscrew the lower locknut (9) and lockwasher (7)
from the return mounting tube (11).
5. Unscrew the swivel union (S) from the supply
mounting tube (12).
CAUTION
If you are removing the mounting tubes, wrench the
tubes close to the motor base to prevent thread
damage in the base. Use thread sealant on the male
threads when reinstalling.
Reconnecting the Displacement Pump
1. Position the displacement pump on the mounting
tubes (11, 12). Thread the upper locknut (9) onto
the return mounting tube (11) a couple of turns.
Tighten the swivel union (S) securely onto the
supply mounting tube (12). See Fig. 4.
2. Butt the connecting rod (4) and displacement rod
(R) together; if necessary, adjust the locknuts (9)
on the return mounting tube (11) to align the rods.
3. Position the coupling collars (15) so they engage
with the connecting rod (4) and displacement rod
(R). Lower the coupling nut (14) over the coupling
collars and screw it securely onto the displacement
rod.
4. Tighten the locknuts (9) securely.
5. Remount the pump and connect all hoses.
6. Turn on the air to the motor and run the pump
slowly. Adjust the locknuts (9) on the return mount-
ing tube (11) as necessary until the pump operates
smoothly at minimum air pressure to the motor.
Tighten the locknuts securely.
7. Reconnect the ground wire if it was disconnected
during repair.
8. If the pump is not immersed, fill the packing nut/
wet-cup 1/2 full of compatible solvent.
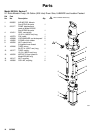
Fig. 4
1
2
Torque to 65–75 ft-lb (88–102 N.m).
Lubricate.
06086
1
3
4
6
7
9
11
12
14
15
7
8
9
S
R
3
Use thread sealant when reinstalling.
3
2
2
Model 223186
Shown
1