


Reciprocator Repair
18 312350K
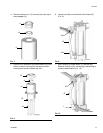
17. If tie rods (38) were removed, reinstall them with
short threaded end up. The other end should be
screwed about 9/16” into bottom cylinder cap (32).
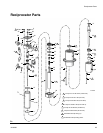
NOTE: When reinstalling cylinder (25), be sure port in
top cylinder cap (31) and port in the bottom cylinder cap
(32) are in line with each other. Be sure o-rings (13) are
in place in the top and bottom and cylinder caps (31 and
32).
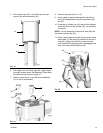
18. Place cylinder (25) on cylinder cap (32).
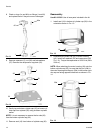
19. Install o-ring (49) in deep, lower groove of piston
(22). Install seal (23) over o-ring. Install piston bear-
ing (24) around upper groove of piston. Holding pis-
ton bearing in place to avoid damage, slide cylinder
over piston and press it down.
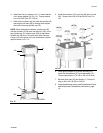
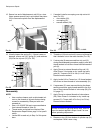
20. Install cap plate (30).
21. Install capscrew (3), o-ring (39) and washer (2).
Install lockwashers (37) and nuts (36). Torque nuts
to 28 to 32 ft-lb (38 to 43 N.m).
22. Reinstall fluid tube (45) and fittings (1). Torque fit-
tings to 28 to 32 ft-lb (38 to 43 N.m).
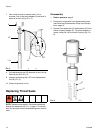
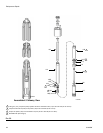
NOTE: Make sure the displacement rod (35) on the
assembled reciprocator is exposed so the pump can be
connected to it.
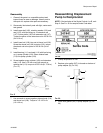
Displacement Pump Repair
Disassembly
• Be sure you have all necessary parts on hand
before you start. If using a repair kit, use all parts in
the kit for the best results.
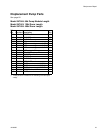
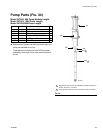
• Displacement Pump Repair Kit 241623 is available.
Parts included in the kit are marked with a dagger
(†) symbol in the parts drawing and list, page 25.
1. If possible, flush pump.
2. Relieve pressure, page 7.
3. Follow instructions for Removing Displacement
Pump from Reciprocator, page 9.
4. Clamp pump in vise.
5. Use wrench to screw shovel tube (117) off pump
cylinder (109).
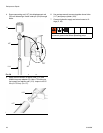
6. Use a wrench to screw piston shovel (116) off of
shovel rod (108).
7. Use strap wrench on pump cylinder (109) to screw it
out of extension tube (114).
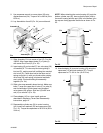
8. Use a 7/8 inch crow foot connector wrench to screw
retainer seal (113) out of pump cylinder (109).
Remove bearing (111) and seal (112).
9. Screw the shovel rod (108) out of the piston (102).
Remove lower ball (106).
10. Screw piston (102) out of extension rod (107).
Remove upper ball (106†), retaining washer (103)
and seal (104).
NOTICE
To avoid damaging shovel tube, do not use slots in
tube to tighten or loosen tube.