


14
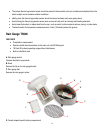
Initial Set up
1. Power up each of the remotes as instructed in previous sections.( Remove clear protective plastic slips from the
battery compartments)
2. Then power up the main display.
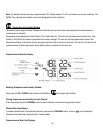
3. Once the main unit is powered, the display will briefly show all available LCD segments for a moment.
4. IMPORTANT: Do not press any buttons during the set up process which typically takes about 5-10 minutes.
The display functions will be automatically set including local altitude and pressure parameters. The display will show the
pressure icon and “inHg” (inches of Mercury) flashing. You will know that the unit is finished self-adjustment when
the display shows the default settings for the pressure and altitude (sea level) Indoor/outdoor temperature and humidity
readings, remote sensors readings, etc.
Many settings can be changed or customized to your preference, after the display has stabilized
• The pressure parameters during Initial Setup (See Pressure and Weather Forecast Window)
• The time, the date and the weekday language (Clock and Alarm Window)
• The location data (City) will determine the time zone
IMPORTANT: If after the initial setup, the altitude or other parameters are not displayed, or dotted lines are displayed, for
example (-.- -) you may have to restart the main unit to reset it..
Note: It is a normal unit operation that history chart is constantly moving on the main unit display
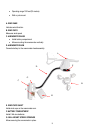
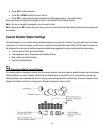
Operation and Window Selection
The main unit has five different operating windows each displaying unique data. When a specific window is selected the
corresponding icon will start flashing. Press the UP arrow button on the main unit to cycle through the windows clockwise or
DOWN arrow button anti-clockwise.
The basic operation of your weather station has been designed to work straight out of the box 10 minutes after power is
provided to the main unit. You will have to select a city location following the steps identified under INITIAL SETUP before
proceeding.
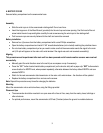
Clock and Alarms Window
Clock and Calendar Displays
To alternate your view of the 5 Clock & Calendar displays, briefly press the SET button:
1. Time with the Day of the week