


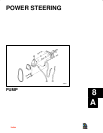


POWER STEERING - 8A-790-823226--1 996
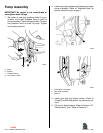
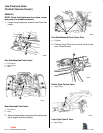
Mounting Bracket
Mounting bracket is removable after pump (refer to
previous instructions) and alternator (refer to Section
4C - “Charging System”) have been removed. See
“Exploded View” and “Torque Specifications.”
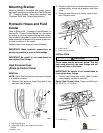
Hydraulic Hoses and Fluid
Cooler
Refer to Section 6A - “Seawater Cooled Models” or
Section 6B - “Closed Cooled Models” for information
on testing or servicing power steering fluid coolers.
The following is provided to assist in replacement of
power steering fluid hoses and to assure proper rout-
ing and connection to the cooler.
Replace high or low pressure hoses following:
IMPORTANT: Make hydraulic connections as
quickly as possible to prevent fluid leakage.
IMPORTANT: Be careful to not cross-thread or
over-tighten hose fittings.
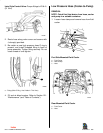
High Pressure Hose
(Pump-to-Control Valve)
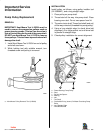
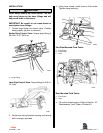
REMOVAL
NOTE: Catch fluid that drains from pump and hoses
in a suitable container.
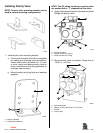
1. Remove high pressure hose fitting and O-ring
seal from rear of pump.
72848
b
a
a - High Pressure Hose
b - Fitting (With O-Ring - Not Visible In This View)
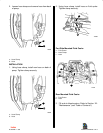
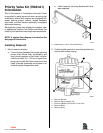
2. Remove hose where routed and secured (port or
starboard side), across top of engine, near valve
cover.
3. Remove small fitting from control valve at tran-
som. Remove hose.
50912
a
b
a - Control Valve
b - Small Fitting And Hose
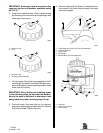
INSTALLATION
!
CAUTION
Route hoses exactly as shown below. This will
help avoid stress on the hose fittings and will
help avoid kinks in the hoses.
IMPORTANT: Be careful to not cross-thread or
over-tighten hose fittings.
1. Thread small fitting into control valve. Position
hose properly (as prior to removal).
Earlier Style Control Valve: Torque small fitting to
96-108 lb. in. (11-12 N·m).
72026
a
a - Small Fitting
Index