


41
8 COMMUNICATING AIDS
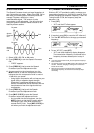
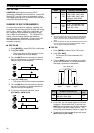
■ Changing the Inter-message Interval Time
For the message playback repeat, access Menu
No. 31 and select “on”. You can also change the
interval playback time of the message. Access
Menu No. 32 and select the time in the range of 0
to 60 seconds in steps of 1 second.
Note:
Menu Nos. 31 and 32 settings are shared with the voice
communication modes when the optional VGS-1 is installed.
■ Changing the CW Sidetone Volume
Turning the AF control does not change the CW
sidetone playback volume. To change the CW
sidetone volume, access Menu No. 13 and select
“oFF”, or “1” to “9”.
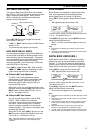
■ Insert Keying
If you operate a CW keyer manually while playing
back a recorded CW message, the transceiver
stops playing back the message. However, during
contests or regular QSOs, you may sometimes
want to insert a different number or message at a
certain point in the recorded message.
In this case, first record the CW message as usual
{page 40}, without the number or message you
want to insert. Then, access Menu No. 33 and
select “on”.
Now if you operate a CW keyer while you play
back a recorded message, the transceiver pauses
the playback of the recorded message, instead of
stopping it. When you finish sending the number
or message with the keyer, the transceiver
resumes playback of the message.
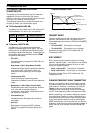
FREQUENCY CORRECTION FOR CW
If you operate both SSB and CW modes, you would
sometimes use SSB mode (USB or LSB) just to
watch and listen to CW signals. It is fine just to
monitor those CW signals but you have experienced
that changing the mode from SSB to CW results in
losing the target CW signal. This is because the
frequency on the display always shows the true
carrier frequency for all modes. If you want the
transceiver to shift the reception frequency to trace
the receiving CW signal when changing the mode
from SSB (USB or LSB) to CW, switch this function
ON. The transceiver shifts the reception frequency
when changing the mode from SSB to CW, so you
can still hear the target signal and instantly transmit
the signal in CW without adjusting the frequency.
1 Press [MENU/ F.LOCK], then turn the MULTI
control to access Menu No. 40.
2 Press [ ] to select “on”.
3 Press [MENU/ F.LOCK] to store the settings and
exit the Menu mode.
AUTO CW TX IN SSB MODE
If you operate both SSB and CW modes, you can
configure the transceiver to change the operating
mode from SSB (USB or LSB) to CW and then
transmit in CW mode automatically when you operate
the CW keyers.
1 Press [MENU/ F.LOCK], then turn the MULTI
control to access Menu No. 39.
2 Press [ ] to select “on”.
3 Press [MENU/ F.LOCK] to store the settings and
exit the Menu mode.
Note:
You must switch the CW Break-in function ON to change the
mode and transmit in CW mode {page 39}.
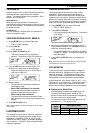
MIC UP/ DWN KEY PADDLE MODE
This function allows you to send CW message
without using an optional paddle {page 7}. Mic [UP]
key can be used as dot paddle and Mic [DWN] key
can be used as a dash paddle.
To activate Mic UP/ DWN key Paddle mode:
1 Turn the transceiver OFF.
2 Press Mic [UP] or Mic [DWN]+[ ] (POWER).
• Press and hold Mic [UP] to send dots or Mic
[DWN] to send dashes in CW mode.
To exit Mic UP/ DWN key Paddle mode, perform step
1 and 2 again.
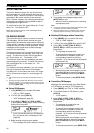
SWAP DOT AND DASH PADDLE POSITION
This function reverses the position of the dot and
dash paddle positions. As a default, the left paddle
sends dots and the right paddle sends dashes. This
function reverses these positions. When this function
is ON, the left paddle sends dashes and the right
paddle sends dots.
1 Press [MENU/ F.LOCK].
2 Turn the MULTI control to select Menu No. 38.
3 Press [ ] to select “on”.
4 Press [MENU/ F.LOCK] to store the setting and
exit Menu mode.
• The left paddle now sends dashes and the right
paddle now sends dots. To return to the
normal paddle positions, select “oFF” in step 3.