64
OCi OPERATING MANUAL
© 2002 Design, 2013 Doc. No. 12-5335-r01 (6/27/13)
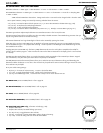
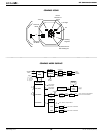
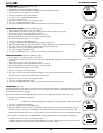
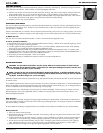
REFERENCE MENU, information includes (Fig. 164):
> Graphic SEL, with selections >>
> SET HEADING -
To access Set Reference Heading..
> REVERSE -
To access Reverse Heading (to change the Reference Heading set by
180°
).
> On time remaining, counting down, if 15 to 0 (sec).
• S (2 sec) - to step back to the Compass OP Main.
• A or M (< 2 sec) - to toggle between the selections.
• S (< 2 sec) - to select that item.
• M (2 sec), at any time - to revert to the Compass OP Main.
• L (< 2 sec) - to toggle the Backlight On/Off.
• L (2 sec), while the Backlight is On - to reset the timer and keep it On for the duration time set.
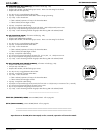
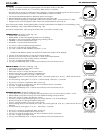
SET REFERENCE HEADING, information includes (Fig. 165):
> Current Depth with FT (or M) icon, blank on the surface.
> Reference Mode icon (2 bars with up arrow), with the graphic SET above it (flashing upon access).
> Static Arrow icon (at 12 o'clock), diver direction of travel.
> Dynamic (moving) Arrow, tracking Reference direction currently set.
> Numeric heading (diver's direction) at lower/right with position graphic.
> On time remaining, counting down, if 15 to 0 (sec).
• S (2 sec) - to step back to the Reference Menu.
• S (< 2 sec) - to flash the numeric Heading value (lower/right), with SET solid.
• Rotate the Compass (keeping it level) in either direction to the new Heading, numeric displayed at the lower/right.
• S (< 2 sec) - to lock in the new Heading, with the numeric replacing the graphic SET.
• M (2 sec), at any time - to revert to the Compass OP Main.
• L (< 2 sec) - to toggle the Backlight On/Off.
• L (2 sec), while the Backlight is On - to reset the timer and keep it On for the duration time set.
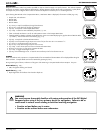
REVERSE REF HEADING, information includes (Fig. 166):
> Current Depth with FT (or M) icon, blank on the surface.
> Reverse Mode icon (2 bars with down arrow) with the reverse Heading (180° opposite of the Reference Heading set) above
it, flashing.
> Static Arrow icon (at 12 o'clock), diver direction of travel.
> Dynamic (moving) Arrow, tracking the Reference direction currently set.
> Numeric heading (diver's direction) at lower/right, with position graphic.
> On time remaining, counting down, if 15 to 0 (sec).
• S (2 sec) - to step back to the Reference Menu.
• S (< 2 sec) - to reverse and save the new Reverse Heading, numeric solid, and revert to the Reverse OP Main.
The value at the lower/right will then indicate actual current direction.
• M (2 sec), at any time - to revert to the Compass OP Main.
• L (< 2 sec) - to toggle the Backlight On/Off.
• L (2 sec), while the Backlight is On - to reset the timer and keep it On for the duration time set.
CALIBRATION (surface only)
Local magnetic fields can effect display of actual location when reading a digital compass. It may be advantageous to Calibrate
the Compass before its first use after purchase, prior to use in a new region, or if inaccuracies are experienced. Calibration will
be required when the battery is changed.
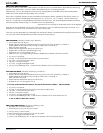
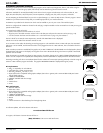
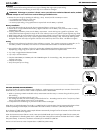
Upon selecting Calibrate on the Compass Main Menu, a Start screen* is displayed, information includes (Fig. 167) -
> Graphics CAL and ROTATE TO CALIBRATE.
> 360 with ° icon.
*The Start screen will also be displayed after the Battery is changed and Data is either saved or cleared.
• S (< 2 sec) - to activate (start) Calibration.
• S (2 sec) - to step back to the Compass Main Menu.
• Slowly and steadily rotate the unit 360° in either direction while maintaining it in a flat level position (keeping it level is
critical for acurracy), CAL progress will be displayed by a dotted circle forming in the center of the screen (Fig. 168).
Rotation should take about 30 seconds. If not fully rotated in 60 seconds, operation will revert to the Compass Main Menu.
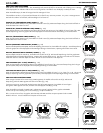
Upon completion, the graphics CAL with PASSED READY or AGAIN FAILED will flash for 3 seconds (Fig. 169A/B), then -
>> If READY, operation will reverts to the Compass OP Main.
>> If FAILED, operation will revert to the Start (CAL ROTATE) screen for repeat.
After 3 attempts, operation will revert to the
Watch or Surface Main and the previous successful Calibration will remain in effect.
Fig. 165 - SET REFERENCE
HEADING
Fig. 166 - REVERSE REF
HEADING
Fig. 167 - START CAL
Fig. 168 - PROGRESS
(turn until full circle)
Fig. 169B - CAL FAILED
Fig. 169A - CAL PASSED
Fig. 164 - REF MENU


