


TOOLS REQUIRED FOR MINIMUS & SHADOW+ SERVICING
— # 10 Torx Screwdriver (Sherwood Tool TL117)
— Phillips screwdriver
— 3/4" wrench
— 5/8" wrench
— 9/16" wrench
— Side cutting pliers
— Sherwood In-line Adjusting Tool ( p/n TL102)
— Sherwood Plastic Probe (p/n TL111) to push out orifice
— Sherwood Lever Height Adjusting Tool (TL123)
— Sherwood Stem Socket Tool (p/n TL124)
DISASSEMBLY
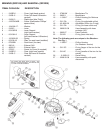
To view the complete parts list of the second stage, fold out the front cover of this manual.
(1) Pull back the hose protector (Item 21) from the inlet end ferrule. Remove the hose assembly (Item 20)
from the orifice housing (Item 16) using a 3/4" and a 5/8" wrench. Inspect the hose assembly for any cuts or
cracks, especially on the hose at the metal ferrules. Replace the hose assembly if any cuts or cracks are
found.
(2) Remove the mouthpiece (Item 15) by cutting the mouthpiece tie (Item 14) with side cutting pliers.
Discard the old mouthpiece tie. Examine the condition of the mouthpiece. Pay particular attention to the area
on top just behind where the old tie tightened. This is a prime area for small holes to develop. If the mouthpiece
is in good condition, it can be reused.
(3) Pry out the exhaust grid (Item 10) with a small screwdriver.
(4) Use a #10 Torx (or small slot) screwdriver to remove the four screws (Item 12) holding the front cover
(Item 1) in place.
(5) Gently remove the diaphragm (Item 2) from the cover. Hold the diaphragm up to a light source.
Gently
stretch the diaphragm and look for tears or pinholes. If any are found, replace the diaphragm. Otherwise, the
diaphragm can be reused.
Note: If the unit is a SR3209 Shadow+, at this point you should pull off the swivel (Item 26, Fig. 1) from
the orifice housing (Item 23). Inspect the inner bore of the swivel for any scratches that may have caused air
leakage. Remove and inspect the O-rings (Items 24 & 25) from the orifice housing. Replace them if any wear
or deformation of the O-rings is found. Remove the short hose assembly (Item 27) from the swivel using a
9/16" wrench. Inspect the hose for kinks and bulges.
(6) Hold the case in one hand and use a 3/4" wrench to loosen and remove the orifice housing from the
lever assembly. The case is strengthened at the lever support area to withstand the turning forces of the lever
support when this is done.
(7) Use the Sherwood in-line adjusting tool (p/n TL102) to, back the adjusting orifice (Item 18) out of the
orifice housing until the threads disengage. Remove the in-line adjusting tool, and push the adjusting orifice the
rest of the way out of the orifice housing with the Sherwood plastic probe (p/n TL111).
(8) Remove the O-ring (Item 19) from the adjustable orifice.
2