


5
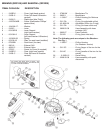
(6) After setting the adjusting orifice, check the relationship between the diaphragm wear plate and the tip
of the lever assembly. If you are reusing the same major parts of the regulator, this measurement will most
likely be correct, and no adjustment will be needed. To check this relationship, temporarily install the diaphragm
(Item 2). With the diaphragm properly seated along its edges, use the finger to tap the wear plate against the
tip of the lever. If a slight gap between the wear plate and the lever tip is detected, the lever is too low. If no gap
is felt, and no air begins hissing when the cover is installed the height of the lever is OK. If air does begin to
hiss only when the cover is installed, the lever is too high.
(7) If no adjustment to the lever height is needed, proceed to step (8). If adjustment either up or down on
the lever is needed, use Sherwood's lever height adjusting tool p/n TL123. Install the lever in the slot of the
tool. Refer to Sherwood's Tools, Repair Kits and Accessories Manual, page 8, for instructions on the use of
the TL-123 tool.
Holding the tool in one hand, with the tip of the lever toward the fingers, bend the lever carefully. Do not
hold on to the case when making this adjustment, as this can result in the lever bending at the wrong area
(near the lever support instead of at the mid-point of the lever). If necessary, bend the lever upward using the
same holding method.
Replace the diaphragm. Continue to test the gap between the lever and the diaphragm after each bending
until the lever is in the correct position.
TESTING
INHALATION EFFORT:
Check the inhalation effort of the second stage with a pan of water about five inches deep.
(1) Slowly immerse the second stage with the inlet hose pointed straight up. Since this is an octopus
regulator, no air should flow before the water floods into the mouthpiece. This type of setting assures that the
regulator will not be prone to free flowing while it is out of the mouth during the dive.
(2) If you use a water column or water manometer to check inhalation effort, it should not be
less than
1.5" - 2" w.c. at cracking. You can alter the inhalation effort within a certain range.,
(3) You can increase the inhalation effort by turning the adjusting orifice (Item 18) clockwise. Discontinue
clockwise adjusting when the lever assembly (Item 5) becomes loose against the lever support (Item 6).
(4) You can decrease the inhalation effort by turning the adjusting orifice counter-clockwise. Discontinue
counter-clockwise adjusting when air begins to hiss past the second stage orifice.
EXHALATION EFFORT:
If you do not use instruments to check the exhalation effort, the flow should feel smooth and unrestricted.
If you use a water column, it should not exceed 1/2" w.c. at one atmosphere. Brand new exhaust valves
will sometimes adhere slightly to the case, causing a slight increase in exhalation effort. This condition will
disappear with use.
LEAK TEST:
(1) Disconnect the air supply. Purge the regulator of all positive air pressure.
(2) Slowly immerse the second stage in a pan of water with the mouthpiece pointing straight up.