


149-072011 Model 2002 Vacuum Gauge Page 6 of 38
2. Installation
This section is designed to assist in getting a new pressure gauge into operation as quickly and easily as
possible. Please read the following instructions thoroughly before installing the instrument.
2.1. Receiving Inspection
Carefully unpack the Hastings Model 2002 Instrument (part # HPM-2002), transducer (part #HPM-2002s)
and cable (part # CB 2002). Inspect all items for any obvious signs of damage due to shipment. Immediately
advise the carrier who delivered the shipment if any damage is suspected.
Compare each component shipped against the packing list. Ensure that all parts are present (i.e. transducer,
power supply, cables, etc.). In addition to the components listed on the packing list, the shipment includes:
AC power cord, panel mounting hardware, 9-pin female D connector. Optional equipment or accessories
will be listed separately on the packing list.
2.2. Quick Start
Follow this procedure to get your new Model 2000 vacuum gauge up and running.
1. Remove sensor from protective packaging.
2. Transducer tube may be installed in any orientation. However if condensation is likely to occur, then the port
should be orientated downward.
3. When installing 1/8” NPT style transducer tube, use the 7/16” wrench flats on the tube stem.
4. Connect transducer cable (orange) to controller.
5. Connect other end of transducer cable to transducer. A finger tight connection is adequate for proper operation.
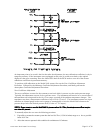
6. If you have computer interface or process control options, these cables can now be attached.
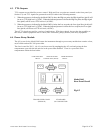
7. I/O port diagram is given in the manual.
8. Connect the AC power cord. The Model 2002 automatically adjusts for 120/240 VAC 50/60 Hz.
9. Turn on power switch. Gauge is now reading pressure in units of “Torr” (default).
10. For best accuracy, the gauge should now be zeroed. Pump the vacuum system down to low 10-6 Torr (if
possible). Ideally the gauge should be operated in this condition for one hour.
11. Place the Model 2002 in the “CAL” mode by using the mode switch. Press the up and down arrows
simultaneously (“CAL” light is now flashing).
12. Press the “ZERO” switch once and return to the “RUN” mode using the mode switch.
The gauge is now ready for normal operation and the display is a true indication of the system pressure (P <
8 Torr is N2 equivalent).
2.3. Transducer Installation
The transducer may be installed in any orientation. Although the transducer is rugged and will perform well
in many harsh environments, the tube should be installed in a clean and careful manner. The tube is
configured with the vacuum fitting requested. If your vacuum environment is highly contaminated or has
unique fitting requirements, a Hastings filter or special adapter may be needed. Please contact the Hastings
Instruments Sales Department for assistance in your system configuration.