


Getting Started
Turning on/off and basic operation
4
Turning on/off and basic operation
To quickly get you started with the QUESTempº 44/46, the following section explains
how to turn on the instrument, run, and stop your session.
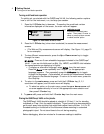
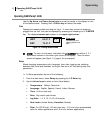
1. Press the I/O Enter key to turn on. Proceeding the model and revision
information displayed on the screen, the main menu will appear.
Figure 1-3: Main menu of the QTº44/46
2. Press the I/O Enter key (when view is selected) to access the measurement
screens.
• (The Wet and Dry measurements screen will display. See Figure 1-6, page 10
for an example).
3. To view different measurements, press the Up or Down arrow key to toggle
through the views.
NOTE: There are 5-user selectable languages included in the QUESTemp
º
44/46. If you see the fields such as Wet, Dry, WBGTi, and WBGTo this indicates
the measurements are displaying in English.
•
To display an alternative language, select Setup from the main menu.
Press the Down arrow repeatedly until “English” (or the appropriate
language) appears. Then repeatedly press the
I/O enter key to toggle
through the languages. Once selected, all menus and measurement screens
will change to the selected language. To return to the main menu, press the
Run/Stop key.
4. To return to the main menu, press and hold the I/O Enter key (3, 2, 1
countdown will appear) and the main menu will display.
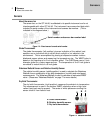
a. To select an option on the main menu, press the up or down arrow until
an arrow appears directly in front of the appropriate menu selection and
then press I/O enter key.
5. To power off, press and hold the I/O enter key from the main menu.
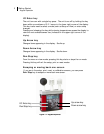
Placing the QUESTempº 44/46 on the job site
The QUESTempº 44/46 should be placed at a height of 3.5 feet (1.1m) for standing
individuals or 2 feet (.6m) for seated individuals. Tripod mounting is recommended to
get the unit away from anything that might block radiant heat or airflow. A 1/4"x 20
threaded bushing on the bottom of the instrument allows mounting to a standard
photographic tripod. Do not stand close to the unit during sampling.
Before datalogging, allow ten minutes for the sensors readings to stabilize.
Indicator arrow
Indicates the selected menu
option. Then press I/O enter to
select or press up/down arrows
to select another option
VIEW PRINT
SETUP RESET