


Y1-03-0211 Rev D 5
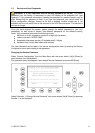
Setting the Internal and External GPS Antenna Position.
NOTE: It is critical for the proper orientation of your ship to other AIS users to enter
this data accurately.
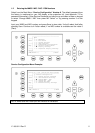
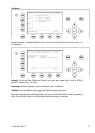
Example: Length of ship / convoy = 220m and Beam of ship / convoy = 43m.
GPS ANTENNA location on ship (is x in above Menu example) is located 200 meters from
bow (A) and 33 Meters from Starboard side (D).
NOTE: You can only enter Dimension A and D. B and C are automatically calculated.
You would enter A200D33 (without spaces, no decimals and no commas).
Then Press Save.
The line than should look like the example above for External Reference point.
Note: When only using internal GPS antenna it is ok to have default values for external
position since they are not used.
RefPointExt = A200 B20 C10 D33m (Position of the external GPS antenna)
A = the distance from bow (front) to the antenna.
B= the distance from the antenna to the stern (rear)
C = the distance from the port (left) side to the antenna
D = the distance from the antenna to the starboard (right) side
Enter RefPtInt (location of the internal GPS antenna) in the same way.
Save the new settings by pressing [Save].
Press [Back] return to the Main Menu Screen without saving any changes.
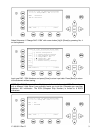
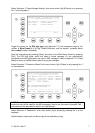
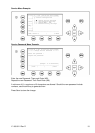
1.4 Entering Voyage Related Data
Select The
default password from the factory is mentioned on your AIS display at the protection foil.
(see Appendix 7.3 for password information). Enter Password and use the up and down
arrows to edit Voyage Related data then press Enter or the numeric reference on the keypad
to select and edit.
Save after editing.
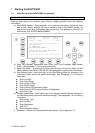
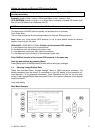
Main Menu Example:
N 1
o
20' E 0
o
13' |1> N/A|2>0.00|3>0.10nm
|----------------------------------
| Menu
-----| |
| +- 1. Messages
View | +- 2. AIS Status
| +- 3. Voyage Settings
-----| +- 4. Ship Settings
| +- 5. Transponder Configuration
Msg. | +- 6. Service Configuration
| +- 7. Display Settings
-----| +- 8. Graphical Display Settings
|
Displ|
----------------------------------------
NUM|Select->| | |<-Back