


Installing the Canopy Cover:
The first step in assembling your Ttop is to lace on the Sunbrella cover
(purchased separately in the color of your choice). Since you are installing a
new Ttop, you will find lacing the cover is much easier if you do it on a table
before mounting the canopy frame onto the uprights. Or you may choose to
wait until after the Ttop is fully installed and do the lacing while standing on
your boat’s gunnels. If possible, work in a clean open area as you will have
70 feet of cord to lace. It is easier to avoid tangles if you can straighten out
the cord as you proceed from grommet to grommet and you don’t want to get
the white cord dirty.
1. It is easiest to lace the canopy with the frame on a table at a comfortable
working height. This process will take about 45 minutes.
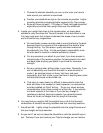
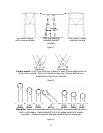
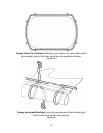
2. Figure # 4 shows how to center the canopy on the frame using the 8 ties
supplied. Orient the cover with the SMITH label down and aft. (the
navigation light bracket on the frame is located toward front.)
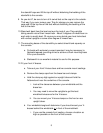
3. Figure # 5 shows how to run the lacing. Begin lacing from any eyelet and
just lightly snug the cord as you go so as to keep the canopy centered on
the frame.
4. Lace only one grommet at the time. Pull all the cord thru each grommet
before moving to the next grommet. As you lace to a grommet with a tie,
remove the tie and discard it. (Don’t try to lace several eyelets and then
pull the cord thru them all at once. If you do, the cord will kink and make
you cuss.)
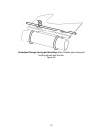
5. Figure #5 shows the best way to tie off the lacing with the least visible
knots.
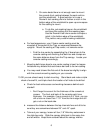
6. Figure #6 shows what the finished lacing should look like after you tighten
the lacing and work the two knots (one on top and one on the bottom)
snug to the lace start/stop grommet.
7. When finished, clip the cord close to the knots and flame melt a nice ball
of nylon to prevent un-raveling and to set the knot.
8. The nylon cord and the Sunbrella will stretch and you will need to re-
tighten the cord to take a foot or two of cord out in a few days.
Drilling and Installation:
9. The hard part is behind you and you are ready to begin installation.
10. Being very careful not to disturb the feet as you move from one to the
next, use the Sharpie to mark all 16 foot screw holes.
11. Use the feet as drill guides to avoid drill bit walking. ( a big problem on
textured decks)
7