


back and tighten them more before the sealant sets up after all the
screws are in place.)
e. Now that you have the feet attached to the deck, re-connect the
upright to the feet and turn attention up to the standoffs.
i. Be aware if you pre-drill all the holes for both standoffs at
one time, you may discover the alignment has changed
slightly for the second standoff after you have tightened the
mounting of the first standoff. You may choose to
completely install each standoff in rotation to avoid this
pitfall.
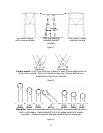
ii. Lean on the upright and press the standoff’s mounting flange
firmly and as squarely as possible against the console and
use the long 1/4” drill bit to drill thru the standoff screw flange
holes straight through the console.
iii. If the curvature of your console is great at the mounting
location you may discover too much gap under the foot
flange. Fashion a taper ship from a material like Starboard
if needed.
iv. (If you discover you are drilling into wood reinforcing inside
the side of the console, stop and coat the inside of the hole
with sealant to prevent rot before continuing.)
v. Install the screws, backing plate and nuts and tighten down
the standoffs.)
16. Repeat the process on the other side.
17. With both uprights now fastened solidly, mount the front V brace casting
as planned earlier in fitting step #12.
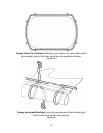
18. Lift and place the canopy into the upright channels.
19. Coat the first ½” of the threads of the canopy bolts with a small amount of
heavy grease to prevent the large nuts from possibly seizing on the large
bolts. Install bolts head down, nut on top using the Allen wrench and 9/16
wrench. You need only snug the bolts, don’t over tighten.
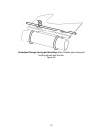
20. Check that the canopy slide castings are centered and then tighten the
slide casting setscrews using your 1/8” Allen key.
9