


23
be sure to leave enough slack in the cables to allow tilting or swiveling
the unit. If you choose to fill in the hole, be sure to position the cables
against the rear edge of the hole as you apply the fill material.
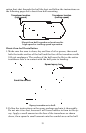
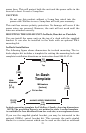
Before positioning the bracket, be sure to hold the cables against the rear
edge of the hole. Then, slide the bracket over the hole and butt the rear
of the bracket base firmly against the cables, thus pinning them in place
against the side of the hole. Finally, fasten the bracket to the dash.
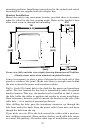
Attach the unit to the gimbal bracket using the supplied gimbal knobs
and washers. Slide the rubber washers onto the gimbal knobs then
loosely screw the knobs into their sockets. Slide the unit into the
bracket with the rubber washers to the outside of the bracket arms. Tilt
the unit to the desired viewing angle and tighten the knobs finger tight
Portable Sonar Installation
Like many Eagle products, the FishEasy 2 sonar family is capable of
portable operation by using the optional PPP-13 portable power pack.
In fact, the FishEasy 2 Portable package includes the PPP-13 and the
transducer necessary for portable use.
The power pack and portable or floating transducers expand the uses
for your sonar. You can use your FishEasy 2 or FishEasy 2 Portable on
your boat or take it to the dock, on a float tube, on an ice fishing trip or
use it as a second sonar in a friend's boat.
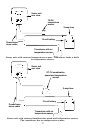
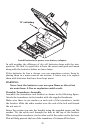
The PPP-13 package includes the power pack, battery adapter and a port-
able transducer. Batteries are not included. The power pack has a storage
compartment for the portable transducer. The pack can be used with eight
"D" cell alkaline batteries or an optional sealed, rechargeable battery.
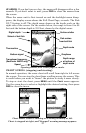
To use the portable power pack, you simply install the batteries and
then attach the sonar unit to the power pack's bracket. Plug in the
power and transducer cables and you're ready to fish.
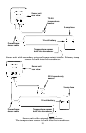
Attach the sonar unit to the bracket with the supplied washers and
knobs.
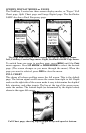
Installing the Power Pack
Recommended tools for installation include a slotted screw driver and
two adjustable wrenches. The following figure shows the proper ar-
rangement for the washers.