


Fishnder 400C Owner’s Manual
InstallIng the FIshFInder 400c
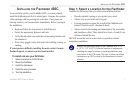
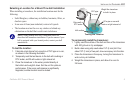
When selecting a transom mount location, consider the following for
optimal performance:
• For your sonar to operate properly, the transducer must be
located in calm water. DO NOT mount the transducer behind
strakes, rivet lines, struts, ttings, water intake, discharge
ports, eroding paint, or anything that creates turbulence.
• Mount the transducer as close to the center of the boat as
possible.
• DO NOT cut the transducer lead. (This voids your warranty.)
• DO NOT mount the transducer in locations where it might be
jarred when launching, hauling, trailering, or storing.
• DO NOT mount the transducer in the path of the prop on
single-drive boats. The transducer can cause cavitation that
can degrade the boat’s performance and damage the prop. On
twin-drive boats, mount the transducer between the drives, if
possible.
NOTE: DO NOT mount the transducer behind strakes, struts,
ttings, water intake or discharge ports, or anything that creates
air bubbles or causes the water to become turbulent. The
transducer must be in clean (non-turbulent) water for optimal
performance.
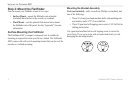
Tool List (not included)—drill, 3/8" wrench or socket, 5/32" and
1/8" drill bits, masking tape, #2 Phillips screwdriver, and marine
sealant.
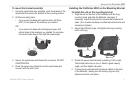
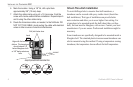
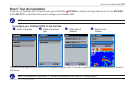
To mount the transducer on a transom:
1. Positionthetransducermountattheselectedtransom
location.Makesurethetransducerisparallelwiththewater
line.Markthecenterlocationsofeachholeonthetransducer
mount.
2. Usinga5/32"bit,drillthepilotholesapproximately1"
(25mm)deepatthemarkedlocations.Toavoiddrillingthe
holestoodeep,wrapapieceoftapearoundthebitat1"from
thepointofthebit.
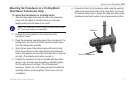
3. Applymarinesealanttothe5x30mmscrews.Attachthe
transducerassemblytothetransomusingthe5x30mm
screws.Adjustthetransducerassemblytoextendbeyond
thebottomofthetransomapproximately1/8"(3mm)on
berglasshullsor3/8"(10mm)onaluminumhulls.Adjustthe
transducerassemblytobealignedparallelwiththewater.
4. Tightenthe10-32lockingnutuntilittouchesthemounting
bracket,andthentighten1/4turnmore.(Donotovertighten.)
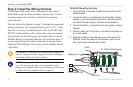
5. Placetherstcableclamponthetransducercable
approximatelyonethirdofthedistancebetweenthe
transducerandthetopofthetransom.