


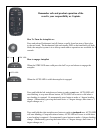

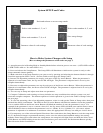

System SETUP and Codes
Push and release to access setup mode.
Select code numbers 1, 2, or 3
Select code numbers 7, 8, or 9
Increase value of code settings
Select code numbers 4, 5, or 6
Save setup change
Decrease value of code settings
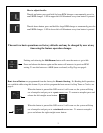
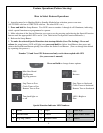
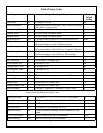
How to Make System Changes with Setup
(How to change the parameters of the codes on page 7)
1) Autopilot must be in Heading Hold or Standby Mode before selection process can start. (AUTO LED solid on
or STBY LED solid on. No other LED’s on.)
2) Press and release the Setup Button. The Setup LED will illuminate to indicate the system is ready to take
setup commands (button pushes).
3) Make selection of the Setup Function you want to use by pressing and releasing the buttons labeled 1 through
9 until the appropriate LED’s are lit. (See the Table on next page for Setup Codes).
4) Increase an adjustable parameter one step by each press of the Up Arrow Button. When the parameter is
adjusted to its maximum value, the Up arrow LED will light. The parameter is adjusted and is in use by the
autopilot immediately.
5) Decrease an adjustable parameter one step by each press of the Down Arrow Button. When the parameter is
adjusted to its manimum value, the Down Arrow LED will light. The parameter is adjusted and is in use by the
autopilot immediately.
6) You can stay in Setup and adjust more than one parameter
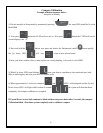
7) Compass Calibration, and resetting to factory defaults are setup conditions that take the system over and
restart the autopilot computer. The button sequences for their operation is given in the Table of Setup Codes on
the next page.
8) To view the operating value of an adjustable parameter, select its code per the Table of Setup codes, then press
and hold the Select Load Button. The LED on the UP Arrow Button will blink the number of tens the parameter
is set to and the LED on the Down Arrow Button will blink the number of ones the parameter is set to. For
example if the parameter is set to a current value of 15, the Up Arrow LED will blink once and the Down Arrow
LED will Blink 5 times to indicate the parameter is set to 1 (blink) X 10 + 5 (blinks) X 1. Of course, when a
parameter is adjusted to its minimum or maximum value, the appropriate LED stays on solid per 4 and 5 above.
9) For temporary use of the selected Special Functions: Press and release the Setup Button to exit the setup mode.
10) To download changes to permanent memory and to save the selected and modied settings into startup
defaults: Enter Setup (press and release the setup button, the setup led will light) Press and hold the Select Load
(GPS) Button and while holding down the select load button, press and release the Deckmount Button quickly,
then release the Select Load Button.
6