


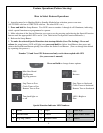

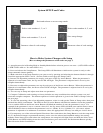

Compass Calibration, Autopilot Tuning and Setup
1) Calibrate your Compass. Compass calibration is a very important step and must be done. (North needs to be
set also for GPS functions.) Find some smooth water where you can drive in circles without running into anything.
• With the Pilot in Standby mode, press and release the Setup button and select code 47
• Press and hold Select Load, press and release the Deckmount Button, then release Select Load
• The Up Arrow LED will turn on
• Now drive in a straight line and watch for the UP Arrow LED to start blinking. When it starts to blink,
begin turning to starboard. Turn at a rate that makes a full 360 degree turn in 30 seconds to one minute. You will
need to make about 3 full turns.
• Continue to turn until the UP Arrow and Down Arrow LED’s are both lit up.
• They will stay lit for about 5 seconds and then the system will completely power down. Your compass is now
calibrated.
If the Up and Down Arrows both continue to blink and does not power down, the compass Calibration failed.
Check for magnetic disturbances in the space around the compass and try to calibrate again. Make the turn as smooth
(unaccelerated as you can. You will need to shut down the Autopilot and restart it before re calibration.
2) Verify your tachometer is functioning properly
• Press Setup and select code 36.
• Press and hold Select Load and you should see the UP Arrow and Down Arrow LED’s blink your RPM. For
example; when the Up Arrow LED blinks 2 times and the Down Arrow LED blinks 5 times your engine is running at
2500 RPM. The autopilot tachometer system has a lower limit setting of 500 RPM, so if your motor is running more
than 500 RPM and you see 500 on the remote, you are not receiving the tach signal. Move your tachometer cable
closer to your spark plug wires if you don’t see the correct RPM’s on your remote. If you see erratic readings, clip off
some of the white antenna, most of the time a 1/2 inch antennae ties to the plug wire is best.
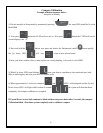
3) Tune the feedback gains. Start from Standby mode. Press and release Setup button (setup button will light
and select code 2; this is the rudder gain adjustment code. Run your boat in a straight line at 1/3 to 1/2 full speed and
engage the pilot by pressing the Auto button. Don’t expect to see good performance yet.
a) If the boat is heading and the kicker starts oscillating, turn the Rudder Gain down by pressing and releasing
the Down Arrow button as many times as required to calm the oscillation.
b) If the boat is making slow “S” turns, turn the Rudder Gain up by pressing and releasing the Up Arrow button
until the boats heading and kicker start to get “twitchy” then back down on the Rudder Gain a few clicks.
Now select an enter code 3, this is the Counter Rudder Gain adjustment code.
a) If the boat heading has slow oscillations, increase the Counter Rudder Gain.
Alternately adjust the Rudder Gain and Counter Rudder Gain until the boat is steering well.
Now initiate some turns with the Straight Right or Straight Left Arrow buttons. Hold the button down only long
enough to move the kicker 30 degrees or so, then let up. The pilot will try to stop then turn smoothly and then
maintain the new heading.
a) If the pilot doesn’t stop the turn very well, decrease Counter rudder gain and increase Rudder Gain.
b) If the pilot moves the rudder to far when stopping the turn, increase the Counter Rudder Gain.
You should be able to home in on the proper gain settings in a few minutes.
You now want to try different speeds and make mirror adjustments to the gains. You will probably need to readjust
several times at different speeds to get the system working well at all speeds. If you nd that it just won’t tune for
all speeds consider the following.
a) If you nd that high speed performance gets “twitchy” when low speed performance is adjusted well,
reduce the speed schedule (code 35) with down arrow and re-tune.
b) If you nd that high speed performance gets “loose” when low speed performance is adjusted well,
increase the speed schedule (code 35) with down arrow and re-tune.
4.) For Temporary use of these selected Special Functions: Press and release the Setup Button to exit the setup
mode.
5.) Download to permanent memory that parameters you have adjusted so far. With the Setup LED lit, press
and hold the GPS (Select Load) button-the load LED should illuminate, press and release the deckmount On/Off
button quickly, then release the GPS (Select Load) button.
8